Volvo VIDA 2014D Multi-language Guide.
WHAT IS THIS?
Optional guide on how to make it easy to start and login to VIDA with multiple languages.
************************************************** **************************************************
REVISION HISTORY:
Rev 3.
- Added es-ES, fr-FR and pt-PT.
- Added administrator permissions to the batch.
Rev 2.
- Merged this guide with my "Installing Volvo VIDA 2014D on Windows 10 Guide".
Rev 1.
- First draft.
************************************************** **************************************************
PREREQUISITES:
- You need to have followed my "Installing Volvo VIDA 2014D on Windows 10 Guide" and have that up and running:
http://vidadice.blogspot.com/2017/11/install-volvo-vida-dice-2014d-on-windows-10.html************************************************** **************************************************
GUIDE:
To switch between two (or more) languages you need to change the language preferred by the user that logins to VIDA. These users are admin, 1, 2, 3 or 4 depending on your market. All these users get the language set by the patch that you installed earlier. To change the language you need to use OSQL.EXE to change the "AccessServer" database setting "Users" "fkLanguage". I have created simple shortcuts to a batch file for you to run, to change between English (US), Swedish, Spanish, French and Polish in this example package.
A. Unpack the "set_fkLanguage_v2.7z" to C:\VIDA\ and it will unpack in "C:\VIDA\set_fkLanguage".
B. After you have unpacked the files, move the shortcut icons (VIDA en-US, VIDA sv-SE, VIDA es-ES, VIDA fr-FR, VIDA pt-PT) that corresponds to the languages that you have installed, to a preferred location of yours, e.g. the desktop.
C. To run VIDA in Swedish: double click the shortcut "VIDA sv-SE", to run VIDA in English (US): double click the shortcut "VIDA en-US" and so on.
D. Wait for the VIDA icon to turn green (it is in the task tray by the clock), then double click it to open VIDA in IE.
E. If you start Volvo VIDA by other means than the custom shortcuts, it will start with the last language used until you change it again with the custom shortcuts.
For those who want to use this package for another language not included:
- You need to copy one of the *.sql files, rename it to e.g. "de-DE.sql", edit the line to LanguageCode='de-DE' in that file, save it and then run it with this example from a command prompt (or create a new shortcut to it with the switch "de-DE" without the quotes after the target):
set_fkLanguage.cmd de-DE
************************************************** **************************************************
DOWNLOAD:
set_fkLanguage_v2.7z: http://multimirrorupload.com/8jso61d...Language_v2.7z
2017/11/29
How to Install Volvo VIDA 2014D on Win 10 Light version for IT-PRO's
Installing Volvo VIDA 2014D on Windows 10 Guide Light version. FOR IT-PRO's ONLY!
Non IT-PRO's follow this post instead for a more detailed guide:
http://vidadice.blogspot.com/2017/11/install-volvo-vida-dice-2014d-on-windows-10.html
WHAT IS THIS?
For those of you that do not need in depth instructions but already know what simple things like run this and that as administrator, cmd commands, edit registry entries without fear etc... It gives the same results as the original guide but not nearly as specific instructions.
************************************************** **************************************************
REVISION HISTORY:
Rev 2. 2016-08-20
Rev 1. 2016-08-14
- First draft.
************************************************** **************************************************
REQUIREMENTS:
- Microsoft Windows 10 Pro x64
- Volvo VIDA 2014D
- VIDA Patch
2014A.exe 137 KB (140 785 bytes)
CRC32: E5F6F31C
MD5: 4E8084C08BDC59CB7D4DA16E708CDD8B
SHA-1: 4A1A38ECBF4608F7E36FDB38867F3A03D96D1B4C
************************************************** **************************************************
GUIDE:
If you have a clean install of Windows x64 and have not previously installed any version of VIDA or SQL (failed or not): this guide might be for you.
On a system where VIDA has previously failed to install or a previous version of VIDA has been installed and then uninstalled, the cleaning part is the MOST IMPORTANT part, you will find that pre-install guide here: https://vidadice.blogspot.com/ (use search button)
A. Download "Microsoft SQL Server 2008 R2 SP1 - Express Edition" x64 English version "ENU\SQLEXPR_x64_ENU.exe" (117.5 MB) and save it to C:\VIDAInstall\SQL2008R2SP1\ here:
http://www.microsoft.com/en-us/downl....aspx?id=26729
B. Download "Microsoft SQL Server 2008 R2 Service Pack 3" x64 English version "ENU\SQLServer2008R2SP3-KB2979597-x64-ENU.exe" (358.4 MB) and save it to C:\VIDAInstall\SQL2008R2SP3\ here:
http://www.microsoft.com/en-us/downl....aspx?id=44271
C. Install Microsoft SQL Server 2008 R2 SP1 - Express Edition:
- In an Administrator Command Prompt run this:
D. Install VIDA in Windows 7 compatibility mode: \Install\DVD\Vida_dvdheader\Main\setup.exe
- Select VIDA All-in-one and then the language(s) to install.
- Leave the default Destination.
- Let the installation download and install .NET Framework 3.5 if asked.
- Leave the default selection Internet as is, click Save and then Close, Close.
- When Setup asks for a reboot, select No.
E. Download and update Java:
- Uninstall all Java versions.
- End tasks VidaMonitor.exe, java.exe and javaw.exe if started, with Windows Task Manager.
- Delete jdk dir in C:\VIDA\.
- Download and install Java SE Development Kit 7u80 (x64) "jdk-7u80-windows-x64.exe" (140.09 MB) here:
http://www.oracle.com/technetwork/ja...k-7u80-oth-JPR
- Copy dir jdk1.7.0_80 from C:\Program Files\Java\ to C:\VIDA\.
- Rename dir jdk1.7.0_80 in C:\VIDA\ to jdk.
- Uninstall both the Development Kit and Java (no longer needed).
F. Install the patch:
- End task VidaMonitor.exe if started, with Windows Task Manager.
- Unpack the compressed files directly to C: with Z-zip or the like, overwrite all files when asked.
- Locate filldb.cmd in the C:\VIDA\patch dir and run it as administrator.
- Optional: Also run the patch as it is intended from the beginning: Run "2014A.exe" as Administrator and leave the default Destination folder as is (c:\) and select Install. Ignore the taskkill error.
G. Upgrade to Microsoft SQL Server 2008 R2 Service Pack 3:
- In an Administrator Command Prompt run this:
H. Reboot.
I. Start Volvo VIDA All-In-One and allow Internet Explorer to Enable 'WebCGMHlprObj Class'.
Non IT-PRO's follow this post instead for a more detailed guide:
http://vidadice.blogspot.com/2017/11/install-volvo-vida-dice-2014d-on-windows-10.html
WHAT IS THIS?
For those of you that do not need in depth instructions but already know what simple things like run this and that as administrator, cmd commands, edit registry entries without fear etc... It gives the same results as the original guide but not nearly as specific instructions.
************************************************** **************************************************
REVISION HISTORY:
Rev 2. 2016-08-20
Rev 1. 2016-08-14
- First draft.
************************************************** **************************************************
REQUIREMENTS:
- Microsoft Windows 10 Pro x64
- Volvo VIDA 2014D
- VIDA Patch
2014A.exe 137 KB (140 785 bytes)
CRC32: E5F6F31C
MD5: 4E8084C08BDC59CB7D4DA16E708CDD8B
SHA-1: 4A1A38ECBF4608F7E36FDB38867F3A03D96D1B4C
************************************************** **************************************************
GUIDE:
If you have a clean install of Windows x64 and have not previously installed any version of VIDA or SQL (failed or not): this guide might be for you.
On a system where VIDA has previously failed to install or a previous version of VIDA has been installed and then uninstalled, the cleaning part is the MOST IMPORTANT part, you will find that pre-install guide here: https://vidadice.blogspot.com/ (use search button)
A. Download "Microsoft SQL Server 2008 R2 SP1 - Express Edition" x64 English version "ENU\SQLEXPR_x64_ENU.exe" (117.5 MB) and save it to C:\VIDAInstall\SQL2008R2SP1\ here:
http://www.microsoft.com/en-us/downl....aspx?id=26729
B. Download "Microsoft SQL Server 2008 R2 Service Pack 3" x64 English version "ENU\SQLServer2008R2SP3-KB2979597-x64-ENU.exe" (358.4 MB) and save it to C:\VIDAInstall\SQL2008R2SP3\ here:
http://www.microsoft.com/en-us/downl....aspx?id=44271
C. Install Microsoft SQL Server 2008 R2 SP1 - Express Edition:
- In an Administrator Command Prompt run this:
Code:
"C:\VIDAInstall\SQL2008R2SP1\SQLEXPR_x64_ENU.exe" /ACTION=Install /IACCEPTSQLSERVERLICENSETERMS /ROLE=AllFeatures_WithDefaults /INSTANCENAME=VIDA /SAPWD=GunnarS3g3 /SECURITYMODE=SQL /SQLSVCACCOUNT="NT AUTHORITY\SYSTEM" /BROWSERSVCSTARTUPTYPE=Automatic /TCPENABLED=1 /HIDECONSOLE /ENU /QS
- Select VIDA All-in-one and then the language(s) to install.
- Leave the default Destination.
- Let the installation download and install .NET Framework 3.5 if asked.
- Leave the default selection Internet as is, click Save and then Close, Close.
- When Setup asks for a reboot, select No.
E. Download and update Java:
- Uninstall all Java versions.
- End tasks VidaMonitor.exe, java.exe and javaw.exe if started, with Windows Task Manager.
- Delete jdk dir in C:\VIDA\.
- Download and install Java SE Development Kit 7u80 (x64) "jdk-7u80-windows-x64.exe" (140.09 MB) here:
http://www.oracle.com/technetwork/ja...k-7u80-oth-JPR
- Copy dir jdk1.7.0_80 from C:\Program Files\Java\ to C:\VIDA\.
- Rename dir jdk1.7.0_80 in C:\VIDA\ to jdk.
- Uninstall both the Development Kit and Java (no longer needed).
F. Install the patch:
- End task VidaMonitor.exe if started, with Windows Task Manager.
- Unpack the compressed files directly to C: with Z-zip or the like, overwrite all files when asked.
- Locate filldb.cmd in the C:\VIDA\patch dir and run it as administrator.
- Optional: Also run the patch as it is intended from the beginning: Run "2014A.exe" as Administrator and leave the default Destination folder as is (c:\) and select Install. Ignore the taskkill error.
G. Upgrade to Microsoft SQL Server 2008 R2 Service Pack 3:
- In an Administrator Command Prompt run this:
Code:
"C:\VIDAInstall\SQL2008R2SP3\SQLServer2008R2SP3-KB2979597-x64-ENU.exe" /IACCEPTSQLSERVERLICENSETERMS /ALLINSTANCES /HIDECONSOLE /ENU /QS
I. Start Volvo VIDA All-In-One and allow Internet Explorer to Enable 'WebCGMHlprObj Class'.
How to Install Volvo VIDA DiCE 2014D on Windows 10 Pro 64 bit
Installing Volvo VIDA 2014D on Windows 10 Guide.
WHAT IS THIS?
A guide to install Volvo VIDA 2014D on first and foremost Windows 10 Pro x64 but will work on most Windows 7 , 8, 8.1 (32- and 64-bit) and up, especially on a system where VIDA has previously failed to install or a previous version of VIDA has been installed and then uninstalled. On a system such as that, the cleaning part step 1 through 8 is the most important part. Usual errors on such systems are:
- An X is presented in Internet Explorer were the DICE Communication tool selector should be.
- You cannot enter anything in the Username login dialogue.
- "VIDA cannot start as port 80 is already in use".
- "VIDA NOT OK".
Check the troubleshooting section at the end of this guide for solutions.
************************************************** **************************************************
IMPORTANT!
THIS IS A BETA AND HAS NOT THOROUGHLY BEEN TESTED YET. IF YOU FIND ANY ERRORS PLEASE PM ME ASAP!
************************************************** **************************************************
NEWS:
2017-07-04: Now tested and working as expected even on Windows 10 1703 (10.0.15063.447) Creators Update
2017-05-08: Now tested and working as expected even on Windows 10 1703 (10.0.15063.13) Creators Update
2017-05-08: The patch I spoke of in previous news will probably never be ready for public testing as I do not have the time for it anymore
2016-08-20: I am working on a patch for x64-systems that makes this guide superfluous. It will be a 1-2-3 way to install VIDA 2014D with it!
2016-08-14: Guide Zero: Installing Volvo VIDA 2014D on Windows 10 Guide Lite version. FOR IT-PRO's ONLY! (it gives the same result but not nearly as specific instructions):
http://vidadice.blogspot.com/2017/11/install-volvo-vida-2014d-on-win-10-light-version.html
The rest of you please follow the Non-IT Pro guide in this post for a more detailed guide.
************************************************** **************************************************
REVISION HISTORY:
Rev 14. 2016-08-27
- Added another warning to post 16c (WARNING! You cannot install another language after you have upgraded SQL!).
Rev 13. 2016-08-20
- Separated the Cleaning section to another post, this one was getting out of space (limit of characters was reached per post).
- Added command line setup of SQL 2008 R2 SP3 upgrade for easier install in step 18.
- Added a warning to post 16c (WARNING! If you get an "Unhandled Exception" during Multi-language setup, see the Troubleshooting section at the end of this guide BEFORE you continue!).
- The patch needs different ways of installing depending on architecture (step 17b).
- Added optional step 11, install .NET Framework 3.5 before the installation of VIDA.
- 32-bit part is still not thoroughly tested, if you cannot enter anything in the Username login dialogue after following this guide, install the patch the x64-way.
Rev 12. 2016-08-14
- Updated Requirements.
- 64-bit part of the guide is now completely tested.
- Removed Windows 8.1 from the guide, I do not have time to test it on that platform. It probably works though.
- Reworked the guide to fix an error when trying to install VIDA on Windows 10 after KB3163018 or the "Anniversary Update" was installed prior to the VIDA install. Fails with "You got a javax.servlet.jsp.JspException: Define tag cannot set a null value" - Thanks to Orfeous.
- Included option to install more than one language to use in conjunction with my "VIDA Multi-language Guide".
- Included option to upgrade the SQL Server to the latest 2016 version to use in conjunction with my "Upgrade to the latest SQL Server Guide" (x64 only!)
- Changed step 17 (unpack the patch before you run filldb.cmd) to make it run foolproof.
- Tested with the latest Windows 10 (10.0.14393 v.1607) Anniversary Update.
- Other minor corrections and additions/deletions to the guide.
Rev 10, 11.
- Corrections.
Rev 9.
- After Windows Update installs KB3163018, Java does not work properly and VIDA fails to start.
Rev 2-8.
- ...
Rev 1.
- First draft.
************************************************** **************************************************
REQUIREMENTS:
- Microsoft Windows 10 Pro x86/x64 - I strongly recommend that you move to Windows to 64-bit. Especially if you are planning upgrading to SQL Server 2016.
- Volvo VIDA 2014D DVD or ISO-file
- VIDA Patch (2014A.exe works for VIDA 2014A through 2014D). File details:
2014A.exe 137 KB (140 785 bytes)
CRC32: E5F6F31C
MD5: 4E8084C08BDC59CB7D4DA16E708CDD8B
SHA-1: 4A1A38ECBF4608F7E36FDB38867F3A03D96D1B4C
************************************************** **************************************************
GUIDE:
If you have a clean install of Windows and have not previously installed any version of VIDA or SQL (failed or not): begin in this post with step 9.
On a system where VIDA has previously failed to install or a previous version of VIDA has been installed and then uninstalled, the cleaning part step 1 through 8 is the MOST IMPORTANT part
STEPS 9 THROUGH END, INSTALLING SECTION:
9. Prepare your installation and download necessary files:
9a. Create a temporary directory in C:, and name it "VidaInstall". Continue with either x86 or x64 steps depending on your OS installation. x86 works on both 32-bit and 64-bit Windows, but I STRONGLY recommend you to follow the x64 steps on 64-bit Windows because this guide ASSUMES that you do.
nn_x86: This step is for Windows 32-bit. Skip this step if you are on Windows 64-bit.
nn_x64: This step is for Windows 64-bit. Skip this step if you are on Windows 32-bit.
9b_x86. Download:
- Java SE Development Kit 7u80 (x86) "jdk-7u80-windows-i586.exe" (138.35 MB) here:
http://www.oracle.com/technetwork/ja...k-7u80-oth-JPR
- Microsoft SQL Server 2008 R2 SP1 Express x86 English version is included on the VIDA 2014D DVD, no need to download it.
- Microsoft SQL Server 2008 R2 Service Pack 3 x86 English version "ENU\SQLServer2008R2SP3-KB2979597-x86-ENU.exe" (247.2 MB) here:
https://www.microsoft.com/en-us/down....aspx?id=44271
9b_x64. Download:
- Java SE Development Kit 7u80 (x64) "jdk-7u80-windows-x64.exe" (140.09 MB) here:
http://www.oracle.com/technetwork/ja...k-7u80-oth-JPR
- Microsoft SQL Server 2008 R2 SP1 Express x64 English version "ENU\SQLEXPR_x64_ENU.exe" (117.5 MB) here:
http://www.microsoft.com/en-us/downl....aspx?id=26729
- Microsoft SQL Server 2008 R2 Service Pack 3 x64 English version "ENU\SQLServer2008R2SP3-KB2979597-x64-ENU.exe" (358.4 MB) here:
http://www.microsoft.com/en-us/downl....aspx?id=44271
9c_x86. Prepare:
- After the Java SE Development Kit download is complete, open the VIDAInstall directory and create a new folder in there, name it "JDK7u80". Move the "jdk-7u80-windows-i586.exe" to the C:\VIDAInstall\JDK7u80 folder.
- After the SQL Server SP3 download is complete, open the VIDAInstall directory and create a new folder in there, name it "SQL2008R2SP3". Move the "SQLServer2008R2SP3-KB2979597-x86-ENU.exe" to the C:\VIDAInstall\SQL2008R2SP3 folder.
9c_x64. Prepare:
- After the Java SE Development Kit download is complete, open the VIDAInstall directory and create a new folder in there, name it "JDK7u80". Move the "jdk-7u80-windows-x64.exe" to the C:\VIDAInstall\JDK7u80 folder.
- After the SQL Server SP1 download is complete, open the VIDAInstall directory and create a new folder in there, name it "SQL2008R2SP1". Move the "SQLEXPR_x64_ENU.exe" to the C:\VIDAInstall\SQL2008R2SP1 folder.
- After the SQL Server SP3 download is complete, open the VIDAInstall directory and create a new folder in there, name it "SQL2008R2SP3". Move the "SQLServer2008R2SP3-KB2979597-x64-ENU.exe" to the C:\VIDAInstall\SQL2008R2SP3 folder.
9d. Install Microsoft SQL Server 2008 R2 SP1 Express:
- Open a Command Prompt: Click Start and enter "CMD", then right click on "Command Prompt" and select "Run as Administrator". A new CMD-prompt will appear. Copy the following line depending on your architecture and then paste it by right clicking in the CMD-window and select "Paste", then hit enter:
- For Windows x86: (substitute D: for your actual VIDA DVD location))
- For Windows x64:
- The installation of SQL Server will run by itself without any user intervention. Wait until it is complete and then close the Command Prompt.
10. Optional step: Make sure Internet Explorer 11 is installed via Control Panel: View by: Small icons, "Programs and Features", select "Turn Windows features on or off" and make sure Internet Explorer 11 is checked (which is the default in Windows 10).
11. Optional step: If you do not want the automatic download of .NET Framework 3.5 during the installation:
- Go to Control Panel, open "Programs and Features", click on "Turn Windows features on or off".
- Check the box for " .NET Framework 3.5 (includes .NET 2.0 and 3.0)" (if it is not already checked) and then click OK.
12-15. Steps removed.
16. Install VIDA from the VIDA 2014D DVD:
16a. Step removed.
16b. Locate VIDA Setup (setup.exe) in "D:\Install\DVD\Vida_dvdheader\Main" (NOT the setup.exe in the Vida folder) (substitute D: for your actual VIDA DVD location), right click the file and select Properties, go to the Compatibility tab, check "Run this program in compatibility mode for:" and select "Windows 7" from the drop down list, then click OK.
16c. Now run the "setup.exe", still in the Main folder.
- Select VIDA All-in-one and then the language(s) to install. (WARNING! You cannot install another language after you have upgraded SQL!) (For a multi-language setup, first follow this guide and then my "VIDA Multi-language Guide").
- Leave the default Destination folder as is (C:\VIDA\) and click Next.
- Accept the License Agreement.
- If the installation asks to download .NET Framework 3.5, select to "Download and install this feature". After the downloading and installing is done click Close.
- When the Vida Configurator shows up, leave the default selection on the Location tab as is, which is "Internet", (do not change anything on the other tabs) click Save and then Close, Close.
- WARNING! If you get an "Unhandled Exception" during Multi-language setup, see the Troubleshooting section at the end of this guide BEFORE you continue!
- When Setup asks for a reboot, select "No, I will restart my computer later" and then click Finish.
- If Windows Firewall Security Alert shows up for "Java(TM) Platform SE binary", tick both "Private networks" and "Public networks" and click "Allow access".
16d. To fix an incompatibility issue with this old Java version that comes pre-installed with VIDA and Windows Update "KB3163018" (and also pre-installed with Windows 10 v.1607) you need to update Java:
- Uninstall all Java versions (if not already done so).
16e. Make sure that VidaMonitor and Java are closed (they will be started only if you have installed multi-language, but check to make sure anyway): Start Windows Task Manager and click "More details". Locate and right click "VidaMonitor.exe" on the "Details" tab and select "End task", confirm by clicking "End process". Do the same with java.exe and javaw.exe. Close Windows Task Manager.
- Close Internet Explorer.
nn_x86: This step is for Windows 32-bit. Skip this step if you are on Windows 64-bit.
nn_x64: This step is for Windows 64-bit. Skip this step if you are on Windows 32-bit.
16f_x86. On Windows x86 do the following:
- Install: C:\VIDAInstall\JDK7u80\jdk-7u80-windows-i586.exe
- Rename "jdk" folder in "C:\VIDA\" to "jdk.old" (or delete it).
- Copy folder "jdk1.7.0_80" from "C:\Program Files\Java" to "C:\VIDA\".
- Rename folder "jdk1.7.0_80" in "C:\VIDA\" to "jdk".
- Uninstall "Java SE Development Kit 7 Update 80" and "Java 7 Update 80" from Control Panel Programs and Features, you do not need it anymore as all the files VIDA uses we have already copied.
16f_x64. On Windows x64 do the following:
- Install: C:\VIDAInstall\JDK7u80\jdk-7u80-windows-x64.exe
- Rename "jdk" folder in "C:\VIDA\" to "jdk.old" (or delete it).
- Copy folder "jdk1.7.0_80" from "C:\Program Files\Java" to "C:\VIDA\".
- Rename folder "jdk1.7.0_80" in "C:\VIDA\" to "jdk".
- Uninstall "Java SE Development Kit 7 Update 80 (64-bit)" and "Java 7 Update 80 (64-bit)" from Control Panel Programs and Features, you do not need it anymore as all the files VIDA uses we have already copied.
17. Now it is time to install the VIDA Patch (2014A.exe -- check the size or better yet the MD5 or SHA-1 under Requirements in this guide above, to match. You might otherwise have downloaded a virus), the same Patch works for VIDA 2014A through 2014D:
17a. Make sure that VidaMonitor is closed: Start Windows Task Manager and click "More details". Locate and right click "VidaMonitor.exe" on the "Details" tab and select "End task", confirm by clicking "End process". Close Windows Task Manager.
nn_x86: This step is for Windows 32-bit. Skip this step if you are on Windows 64-bit.
nn_x64: This step is for Windows 64-bit. Skip this step if you are on Windows 32-bit.
17b_x86: Now it's time to run the VIDA Patch, the same Patch works for VIDA 2014A through 2014D. "2014A.exe". Run it as Administrator and leave the default Destination folder as is (c:\) and select Install. Ignore the taskkill error. Now skip to step 18.
17b_x64: Do NOT try to install it by running the exe, instead use Z-zip to unpack the compressed files directly to C: (running it will not always work with this setup and will sometimes not patch the installation correctly).
17c_x64. Right click and select "Extract files..." Enter C: in the "Extract to" field and untick the "2014A\" path.
17d_x64. The package will extract to the VIDA-folder, overwrite all files when asked.
17e_x64. Locate the file filldb.cmd in the "C:\VIDA\patch" folder and then right click on it, select "Run as administrator". You will briefly see a CMD-prompt that opens and closes quickly, this is by design and no other confirmation will appear.
18. Now apply the Microsoft SQL Server 2008 R2 SP3 Express Service Pack (KB2979597 - a prerequisite for the SQL 2016 upgrade):
18a. Open a Command Prompt: Click Start and enter "CMD", then right click on "Command Prompt" and select "Run as Administrator". A new CMD-prompt will appear. Copy the following line depending on your architecture and then paste it by right clicking in the CMD-window and select "Paste", then hit enter:
- For Windows x86: (substitute D: for your actual Volvo VIDA DVD location))
- For Windows x64:
- The upgrade of SQL Server will run by itself without any user intervention. Wait until it is complete and then close the Command Prompt.
18c. Reboot.
19. If Windows Firewall Security Alert shows up for "Java(TM) Platform SE binary", tick both "Private networks" and "Public networks" and click "Allow access".
20. Now you should be ready to try VIDA out, but wait for the VIDA Monitor to change to a green play icon (VIDA Monitor is by the task tray):
20a. Connect your DiCE-device to your computer.
20b. Start VIDA All-In-One
20c. If Internet Explorer ask to use Recommended security and compatibility settings chose "Don't use recommended settings".
20d. If Internet Explorer asks permission to enable Several add-ons, click Choose add-ons and Enable both 'Adobe PDF Link Helper' and 'WebCGMHlprObj Class'. If Internet Explorer only asks permission to enable 'WebCGMHlprObj Class' click "Enable".
20e. Login with admin, 1, 2, 3 or 4, depending on your location/market.
WHAT IS THIS?
A guide to install Volvo VIDA 2014D on first and foremost Windows 10 Pro x64 but will work on most Windows 7 , 8, 8.1 (32- and 64-bit) and up, especially on a system where VIDA has previously failed to install or a previous version of VIDA has been installed and then uninstalled. On a system such as that, the cleaning part step 1 through 8 is the most important part. Usual errors on such systems are:
- An X is presented in Internet Explorer were the DICE Communication tool selector should be.
- You cannot enter anything in the Username login dialogue.
- "VIDA cannot start as port 80 is already in use".
- "VIDA NOT OK".
Check the troubleshooting section at the end of this guide for solutions.
************************************************** **************************************************
IMPORTANT!
THIS IS A BETA AND HAS NOT THOROUGHLY BEEN TESTED YET. IF YOU FIND ANY ERRORS PLEASE PM ME ASAP!
************************************************** **************************************************
NEWS:
2017-07-04: Now tested and working as expected even on Windows 10 1703 (10.0.15063.447) Creators Update
2017-05-08: Now tested and working as expected even on Windows 10 1703 (10.0.15063.13) Creators Update
2017-05-08: The patch I spoke of in previous news will probably never be ready for public testing as I do not have the time for it anymore
2016-08-20: I am working on a patch for x64-systems that makes this guide superfluous. It will be a 1-2-3 way to install VIDA 2014D with it!
2016-08-14: Guide Zero: Installing Volvo VIDA 2014D on Windows 10 Guide Lite version. FOR IT-PRO's ONLY! (it gives the same result but not nearly as specific instructions):
http://vidadice.blogspot.com/2017/11/install-volvo-vida-2014d-on-win-10-light-version.html
The rest of you please follow the Non-IT Pro guide in this post for a more detailed guide.
************************************************** **************************************************
REVISION HISTORY:
Rev 14. 2016-08-27
- Added another warning to post 16c (WARNING! You cannot install another language after you have upgraded SQL!).
Rev 13. 2016-08-20
- Separated the Cleaning section to another post, this one was getting out of space (limit of characters was reached per post).
- Added command line setup of SQL 2008 R2 SP3 upgrade for easier install in step 18.
- Added a warning to post 16c (WARNING! If you get an "Unhandled Exception" during Multi-language setup, see the Troubleshooting section at the end of this guide BEFORE you continue!).
- The patch needs different ways of installing depending on architecture (step 17b).
- Added optional step 11, install .NET Framework 3.5 before the installation of VIDA.
- 32-bit part is still not thoroughly tested, if you cannot enter anything in the Username login dialogue after following this guide, install the patch the x64-way.
Rev 12. 2016-08-14
- Updated Requirements.
- 64-bit part of the guide is now completely tested.
- Removed Windows 8.1 from the guide, I do not have time to test it on that platform. It probably works though.
- Reworked the guide to fix an error when trying to install VIDA on Windows 10 after KB3163018 or the "Anniversary Update" was installed prior to the VIDA install. Fails with "You got a javax.servlet.jsp.JspException: Define tag cannot set a null value" - Thanks to Orfeous.
- Included option to install more than one language to use in conjunction with my "VIDA Multi-language Guide".
- Included option to upgrade the SQL Server to the latest 2016 version to use in conjunction with my "Upgrade to the latest SQL Server Guide" (x64 only!)
- Changed step 17 (unpack the patch before you run filldb.cmd) to make it run foolproof.
- Tested with the latest Windows 10 (10.0.14393 v.1607) Anniversary Update.
- Other minor corrections and additions/deletions to the guide.
Rev 10, 11.
- Corrections.
Rev 9.
- After Windows Update installs KB3163018, Java does not work properly and VIDA fails to start.
Rev 2-8.
- ...
Rev 1.
- First draft.
************************************************** **************************************************
REQUIREMENTS:
- Microsoft Windows 10 Pro x86/x64 - I strongly recommend that you move to Windows to 64-bit. Especially if you are planning upgrading to SQL Server 2016.
- Volvo VIDA 2014D DVD or ISO-file
- VIDA Patch (2014A.exe works for VIDA 2014A through 2014D). File details:
2014A.exe 137 KB (140 785 bytes)
CRC32: E5F6F31C
MD5: 4E8084C08BDC59CB7D4DA16E708CDD8B
SHA-1: 4A1A38ECBF4608F7E36FDB38867F3A03D96D1B4C
************************************************** **************************************************
GUIDE:
If you have a clean install of Windows and have not previously installed any version of VIDA or SQL (failed or not): begin in this post with step 9.
On a system where VIDA has previously failed to install or a previous version of VIDA has been installed and then uninstalled, the cleaning part step 1 through 8 is the MOST IMPORTANT part
STEPS 9 THROUGH END, INSTALLING SECTION:
9. Prepare your installation and download necessary files:
9a. Create a temporary directory in C:, and name it "VidaInstall". Continue with either x86 or x64 steps depending on your OS installation. x86 works on both 32-bit and 64-bit Windows, but I STRONGLY recommend you to follow the x64 steps on 64-bit Windows because this guide ASSUMES that you do.
nn_x86: This step is for Windows 32-bit. Skip this step if you are on Windows 64-bit.
nn_x64: This step is for Windows 64-bit. Skip this step if you are on Windows 32-bit.
9b_x86. Download:
- Java SE Development Kit 7u80 (x86) "jdk-7u80-windows-i586.exe" (138.35 MB) here:
http://www.oracle.com/technetwork/ja...k-7u80-oth-JPR
- Microsoft SQL Server 2008 R2 SP1 Express x86 English version is included on the VIDA 2014D DVD, no need to download it.
- Microsoft SQL Server 2008 R2 Service Pack 3 x86 English version "ENU\SQLServer2008R2SP3-KB2979597-x86-ENU.exe" (247.2 MB) here:
https://www.microsoft.com/en-us/down....aspx?id=44271
9b_x64. Download:
- Java SE Development Kit 7u80 (x64) "jdk-7u80-windows-x64.exe" (140.09 MB) here:
http://www.oracle.com/technetwork/ja...k-7u80-oth-JPR
- Microsoft SQL Server 2008 R2 SP1 Express x64 English version "ENU\SQLEXPR_x64_ENU.exe" (117.5 MB) here:
http://www.microsoft.com/en-us/downl....aspx?id=26729
- Microsoft SQL Server 2008 R2 Service Pack 3 x64 English version "ENU\SQLServer2008R2SP3-KB2979597-x64-ENU.exe" (358.4 MB) here:
http://www.microsoft.com/en-us/downl....aspx?id=44271
9c_x86. Prepare:
- After the Java SE Development Kit download is complete, open the VIDAInstall directory and create a new folder in there, name it "JDK7u80". Move the "jdk-7u80-windows-i586.exe" to the C:\VIDAInstall\JDK7u80 folder.
- After the SQL Server SP3 download is complete, open the VIDAInstall directory and create a new folder in there, name it "SQL2008R2SP3". Move the "SQLServer2008R2SP3-KB2979597-x86-ENU.exe" to the C:\VIDAInstall\SQL2008R2SP3 folder.
9c_x64. Prepare:
- After the Java SE Development Kit download is complete, open the VIDAInstall directory and create a new folder in there, name it "JDK7u80". Move the "jdk-7u80-windows-x64.exe" to the C:\VIDAInstall\JDK7u80 folder.
- After the SQL Server SP1 download is complete, open the VIDAInstall directory and create a new folder in there, name it "SQL2008R2SP1". Move the "SQLEXPR_x64_ENU.exe" to the C:\VIDAInstall\SQL2008R2SP1 folder.
- After the SQL Server SP3 download is complete, open the VIDAInstall directory and create a new folder in there, name it "SQL2008R2SP3". Move the "SQLServer2008R2SP3-KB2979597-x64-ENU.exe" to the C:\VIDAInstall\SQL2008R2SP3 folder.
9d. Install Microsoft SQL Server 2008 R2 SP1 Express:
- Open a Command Prompt: Click Start and enter "CMD", then right click on "Command Prompt" and select "Run as Administrator". A new CMD-prompt will appear. Copy the following line depending on your architecture and then paste it by right clicking in the CMD-window and select "Paste", then hit enter:
- For Windows x86: (substitute D: for your actual VIDA DVD location))
Code:
"D:\3PP\Products\SqlExpress\SQLEXPR_x86_ENU.exe" /ACTION=Install /IACCEPTSQLSERVERLICENSETERMS /ROLE=AllFeatures_WithDefaults /INSTANCENAME=VIDA /SAPWD=GunnarS3g3 /SECURITYMODE=SQL /SQLSVCACCOUNT="NT AUTHORITY\SYSTEM" /BROWSERSVCSTARTUPTYPE=Automatic /TCPENABLED=1 /HIDECONSOLE /ENU /QS
Code:
"C:\VIDAInstall\SQL2008R2SP1\SQLEXPR_x64_ENU.exe" /ACTION=Install /IACCEPTSQLSERVERLICENSETERMS /ROLE=AllFeatures_WithDefaults /INSTANCENAME=VIDA /SAPWD=GunnarS3g3 /SECURITYMODE=SQL /SQLSVCACCOUNT="NT AUTHORITY\SYSTEM" /BROWSERSVCSTARTUPTYPE=Automatic /TCPENABLED=1 /HIDECONSOLE /ENU /QS
10. Optional step: Make sure Internet Explorer 11 is installed via Control Panel: View by: Small icons, "Programs and Features", select "Turn Windows features on or off" and make sure Internet Explorer 11 is checked (which is the default in Windows 10).
11. Optional step: If you do not want the automatic download of .NET Framework 3.5 during the installation:
- Go to Control Panel, open "Programs and Features", click on "Turn Windows features on or off".
- Check the box for " .NET Framework 3.5 (includes .NET 2.0 and 3.0)" (if it is not already checked) and then click OK.
12-15. Steps removed.
16. Install VIDA from the VIDA 2014D DVD:
16a. Step removed.
16b. Locate VIDA Setup (setup.exe) in "D:\Install\DVD\Vida_dvdheader\Main" (NOT the setup.exe in the Vida folder) (substitute D: for your actual VIDA DVD location), right click the file and select Properties, go to the Compatibility tab, check "Run this program in compatibility mode for:" and select "Windows 7" from the drop down list, then click OK.
16c. Now run the "setup.exe", still in the Main folder.
- Select VIDA All-in-one and then the language(s) to install. (WARNING! You cannot install another language after you have upgraded SQL!) (For a multi-language setup, first follow this guide and then my "VIDA Multi-language Guide").
- Leave the default Destination folder as is (C:\VIDA\) and click Next.
- Accept the License Agreement.
- If the installation asks to download .NET Framework 3.5, select to "Download and install this feature". After the downloading and installing is done click Close.
- When the Vida Configurator shows up, leave the default selection on the Location tab as is, which is "Internet", (do not change anything on the other tabs) click Save and then Close, Close.
- WARNING! If you get an "Unhandled Exception" during Multi-language setup, see the Troubleshooting section at the end of this guide BEFORE you continue!
- When Setup asks for a reboot, select "No, I will restart my computer later" and then click Finish.
- If Windows Firewall Security Alert shows up for "Java(TM) Platform SE binary", tick both "Private networks" and "Public networks" and click "Allow access".
16d. To fix an incompatibility issue with this old Java version that comes pre-installed with VIDA and Windows Update "KB3163018" (and also pre-installed with Windows 10 v.1607) you need to update Java:
- Uninstall all Java versions (if not already done so).
16e. Make sure that VidaMonitor and Java are closed (they will be started only if you have installed multi-language, but check to make sure anyway): Start Windows Task Manager and click "More details". Locate and right click "VidaMonitor.exe" on the "Details" tab and select "End task", confirm by clicking "End process". Do the same with java.exe and javaw.exe. Close Windows Task Manager.
- Close Internet Explorer.
nn_x86: This step is for Windows 32-bit. Skip this step if you are on Windows 64-bit.
nn_x64: This step is for Windows 64-bit. Skip this step if you are on Windows 32-bit.
16f_x86. On Windows x86 do the following:
- Install: C:\VIDAInstall\JDK7u80\jdk-7u80-windows-i586.exe
- Rename "jdk" folder in "C:\VIDA\" to "jdk.old" (or delete it).
- Copy folder "jdk1.7.0_80" from "C:\Program Files\Java" to "C:\VIDA\".
- Rename folder "jdk1.7.0_80" in "C:\VIDA\" to "jdk".
- Uninstall "Java SE Development Kit 7 Update 80" and "Java 7 Update 80" from Control Panel Programs and Features, you do not need it anymore as all the files VIDA uses we have already copied.
16f_x64. On Windows x64 do the following:
- Install: C:\VIDAInstall\JDK7u80\jdk-7u80-windows-x64.exe
- Rename "jdk" folder in "C:\VIDA\" to "jdk.old" (or delete it).
- Copy folder "jdk1.7.0_80" from "C:\Program Files\Java" to "C:\VIDA\".
- Rename folder "jdk1.7.0_80" in "C:\VIDA\" to "jdk".
- Uninstall "Java SE Development Kit 7 Update 80 (64-bit)" and "Java 7 Update 80 (64-bit)" from Control Panel Programs and Features, you do not need it anymore as all the files VIDA uses we have already copied.
17. Now it is time to install the VIDA Patch (2014A.exe -- check the size or better yet the MD5 or SHA-1 under Requirements in this guide above, to match. You might otherwise have downloaded a virus), the same Patch works for VIDA 2014A through 2014D:
17a. Make sure that VidaMonitor is closed: Start Windows Task Manager and click "More details". Locate and right click "VidaMonitor.exe" on the "Details" tab and select "End task", confirm by clicking "End process". Close Windows Task Manager.
nn_x86: This step is for Windows 32-bit. Skip this step if you are on Windows 64-bit.
nn_x64: This step is for Windows 64-bit. Skip this step if you are on Windows 32-bit.
17b_x86: Now it's time to run the VIDA Patch, the same Patch works for VIDA 2014A through 2014D. "2014A.exe". Run it as Administrator and leave the default Destination folder as is (c:\) and select Install. Ignore the taskkill error. Now skip to step 18.
17b_x64: Do NOT try to install it by running the exe, instead use Z-zip to unpack the compressed files directly to C: (running it will not always work with this setup and will sometimes not patch the installation correctly).
17c_x64. Right click and select "Extract files..." Enter C: in the "Extract to" field and untick the "2014A\" path.
17d_x64. The package will extract to the VIDA-folder, overwrite all files when asked.
17e_x64. Locate the file filldb.cmd in the "C:\VIDA\patch" folder and then right click on it, select "Run as administrator". You will briefly see a CMD-prompt that opens and closes quickly, this is by design and no other confirmation will appear.
18. Now apply the Microsoft SQL Server 2008 R2 SP3 Express Service Pack (KB2979597 - a prerequisite for the SQL 2016 upgrade):
18a. Open a Command Prompt: Click Start and enter "CMD", then right click on "Command Prompt" and select "Run as Administrator". A new CMD-prompt will appear. Copy the following line depending on your architecture and then paste it by right clicking in the CMD-window and select "Paste", then hit enter:
- For Windows x86: (substitute D: for your actual Volvo VIDA DVD location))
Code:
"C:\VIDAInstall\SQL2008R2SP3\SQLServer2008R2SP3-KB2979597-x86-ENU.exe" /IACCEPTSQLSERVERLICENSETERMS /ALLINSTANCES /HIDECONSOLE /ENU /QS
Code:
"C:\VIDAInstall\SQL2008R2SP3\SQLServer2008R2SP3-KB2979597-x64-ENU.exe" /IACCEPTSQLSERVERLICENSETERMS /ALLINSTANCES /HIDECONSOLE /ENU /QS
18c. Reboot.
19. If Windows Firewall Security Alert shows up for "Java(TM) Platform SE binary", tick both "Private networks" and "Public networks" and click "Allow access".
20. Now you should be ready to try VIDA out, but wait for the VIDA Monitor to change to a green play icon (VIDA Monitor is by the task tray):
20a. Connect your DiCE-device to your computer.
20b. Start VIDA All-In-One
20c. If Internet Explorer ask to use Recommended security and compatibility settings chose "Don't use recommended settings".
20d. If Internet Explorer asks permission to enable Several add-ons, click Choose add-ons and Enable both 'Adobe PDF Link Helper' and 'WebCGMHlprObj Class'. If Internet Explorer only asks permission to enable 'WebCGMHlprObj Class' click "Enable".
20e. Login with admin, 1, 2, 3 or 4, depending on your location/market.
How to Update Volvo VIDA DiCE 2014D SQL Server
Upgrading the Volvo VIDA 2014D SQL Server.
WHAT IS THIS?
This guide is for those of you, like me, who want programs to work at peak performance and up to date. In this guide I will show you how to upgrade Volvo VIDA 2014D in Windows 10 x64 with the latest Microsoft SQL Server Express 2016 x64 instead of the 2008 R2 SP1 x86 one that is somewhat incompatible with at least Windows 10, and full of security holes.
************************************************** **************************************************
IMPORTANT!
ALL FILES TO BE DOWNLOADED IN THIS OPTIONAL GUIDE MUST BE THE EXACT SPECIFIC VERSION AND LANGUAGE SPECIFIED IN THE GUIDE, DOUBLE CHECK NAME AND SIZE OF THE FILES BEFORE INSTALL!
************************************************** **************************************************
REVISION HISTORY:
Rev 4.
- Removed the 32-bit option (no SQL 2016 x86 exists).
Rev 3.
- Moved the multi-language guide out of this to another optional guide.
Rev 2.
- Merged this guide with "Installing Volvo VIDA 2014D on Windows 10 Pro Guide".
- Updated this guide to install with Microsoft SQL Server Express 2016 instead of Microsoft SQL Server Express 2014 SP1
- Updated links.
Rev 1.
- First draft.
************************************************** **************************************************
PREREQUISITES:
- You need to have followed my "Installing Volvo VIDA 2014D on Windows 10 Guide" and have that up and running, this upgrade will NOT fix a non-working installation of VIDA.
http://vidadice.blogspot.com/2017/11/install-volvo-vida-dice-2014d-on-windows-10.html
- Microsoft Windows 10 x64-only.
************************************************** **************************************************
WORKFLOW:
a. Follow "Installing Volvo VIDA 2014D on Windows 10 Guide".
b. Download the necessary files.
c. Upgrade the VIDA database and SQL Server to the latest SQL Server Express 2016.
d. Optional tweaking.
************************************************** **************************************************
GUIDE:
If you have had a previous version of VIDA installed on your computer or a failed install of VIDA I recommend strongly that you do step 1 through 8 in my "Volvo VIDA 2014D and Windows 10 Pro Guide", BEFORE jumping to step 1 and continuing with this optional guide.
A. Create a temporary directory in C:, name it "VIDAInstall".
B. Download the Microsoft SQL Server 2016 Express installer on this page that, when executed, will present options to perform an installation or download media only. "SQLServer2016-SSEI-Expr.exe" (3.07 MB) here:
https://www.microsoft.com/en-us/download/details.aspx?id=52679
- After the download is complete, open the VIDAInstall directory and create a new folder in there, name it "SQL2016". Move the "SQLServer2016-SSEI-Expr.exe" to the C:\VIDAInstall\SQL2016 folder.
C. Upgrade to Microsoft SQL Server 2016 Express:
- Locate "C:\VIDAInstall\SQL2016\SQLServer2016-SSEI-Expr.exe" and run it.
- Select "Download Media".
- Select Language "English"
- Select Package "Express Core".
- Select Download Location "C:\VIDAInstall\SQL2016".
- Select "Download".
- Wait for the download to complete and then select "Close" and then confirm exit with "Yes".
- Locate "C:\VIDAInstall\SQL2016\SQLEXPR_x64_ENU.exe" and run it. Let it extract to the default path (C:\VIDAInstall\SQL2016\SQLEXPR_x64_ENU\).
- Select "Upgrade from a previous version of SQL Server".
- Accept the license terms and click Next.
- Let the installer check for updates and if found let it download and install them.
- Instance to upgrade: "VIDA" and then click Next.
- Finally click Close, and then exit SQL Server Installation Center.
Volvo DiCE Unit Installation Instruction
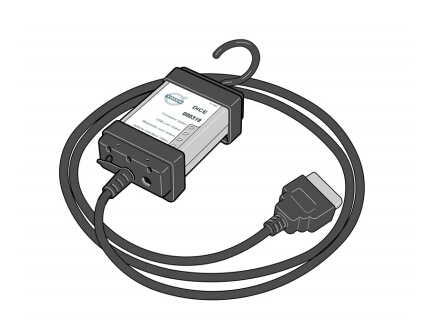
1.0 Introduction DiCE
– Diagnostic Communication Equipment is a tool that is used together with VIDA All-in-One to communicate with the vehicle. Communication makes diagnosing and troubleshooting the vehicle possible, as well as the downloading of software.
Volvo VIDA DiCE uses Bluetooth to transfer information wirelessly between the vehicle and VIDA All-in-One. This gives the technicians more flexibility. A USB cable can be used as an alternative to Bluetooth.
1.1 Support For general support and questions concerning DiCE, submit a Help Request via www.volvotechinfo.com.
1.2 Uninstalling built-in Bluetooth
If you have built-in Bluetooth on your client or Panasonic Toughbook CF30 (purchased prior to February 2008) it has to be uninstalled for DiCE to work properly.
1.3 Install the latest Vida edition
Install the latest version of VIDA and all applicable eUpdates, prior to beginning this installation process. The most current information concerning VIDA is available on Volvotechinfo.
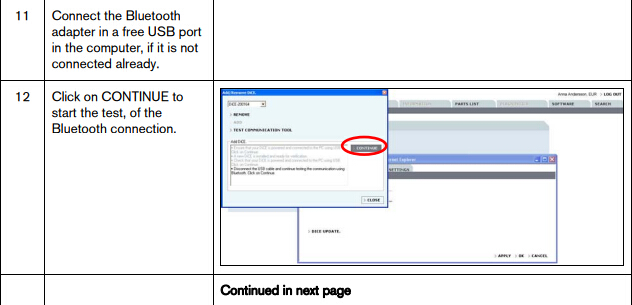
1.4 Plug in of the supported Bluetooth USB adapter
Insert the Bluetooth adapter (9513005) along with the USB cable (9513007).Several installation images will appear, with the below image finally appearing:
Note! The only supporting Bluetooth adapter is the Volvo supplied adapter, part number 9513005.

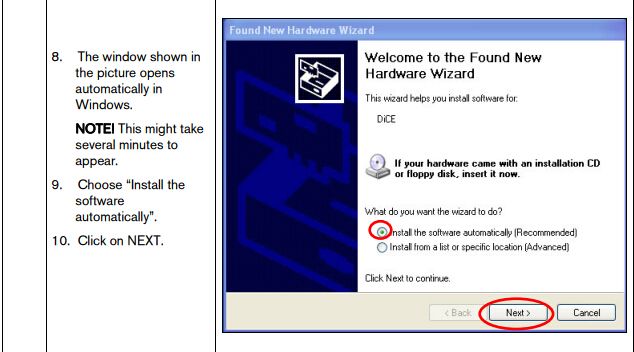
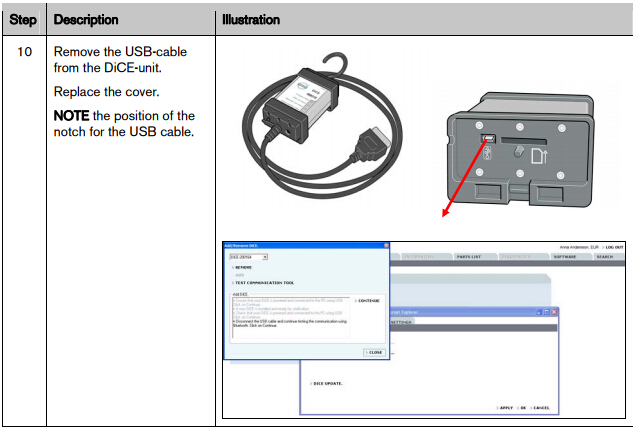
1.5 Installation of USB driver for DiCE
For each new or additional DiCE unit that is going to be used in VIDA, the USB driver must be installed separately. This is done automatically in Windows when the DiCE unit is inserted into a USB port. Carry out the instructions below.

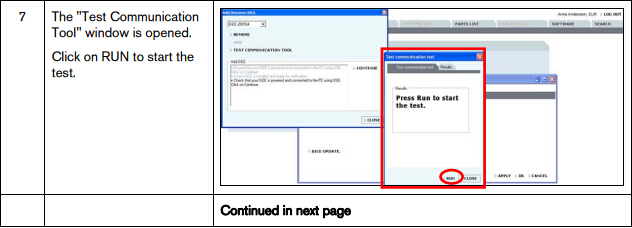
1.6 Adding the DiCE Unit into Volvo VIDA
To add a DiCE, carry out the following:
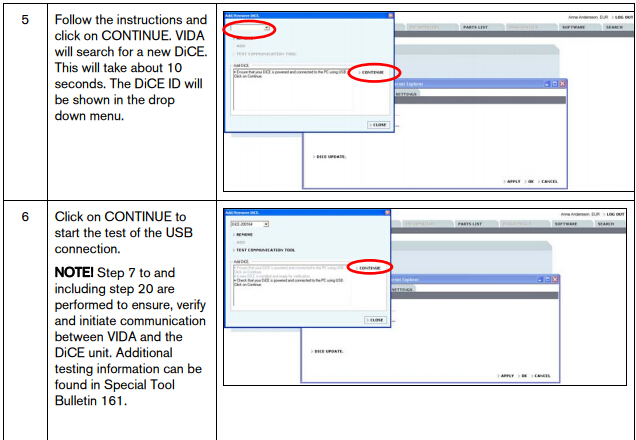
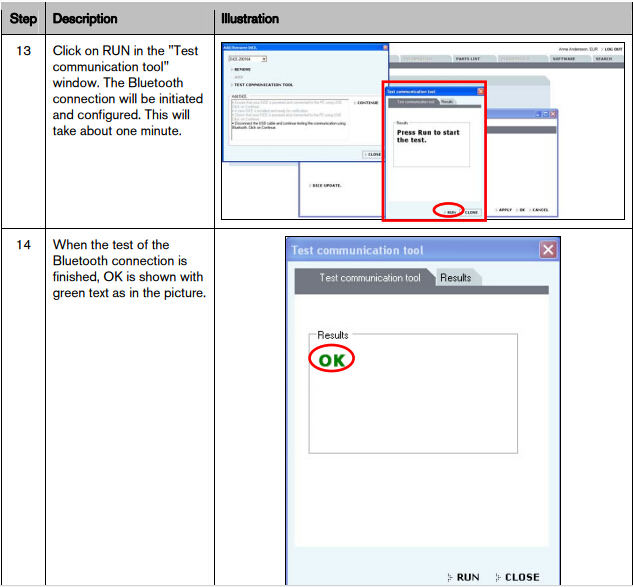
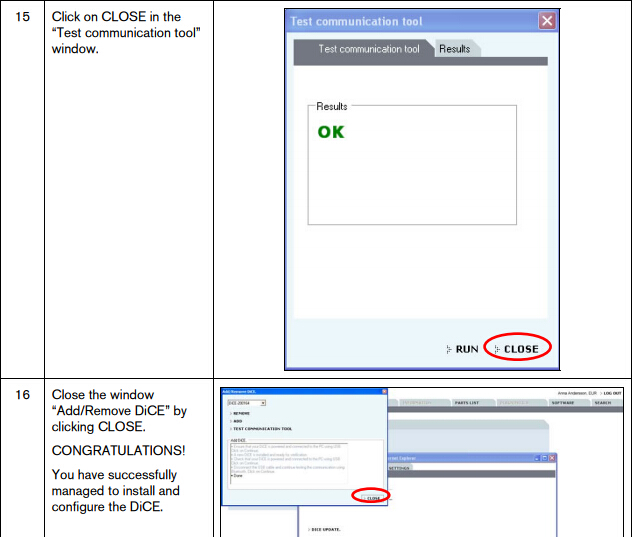
The DiCE unit is now configured for both USB and Bluetooth connection at the VIDA client. To set DiCE as the default communication tool, see section 1.7
NOTE! If DiCE is connected with a USB cable, the communication will always go through USB.
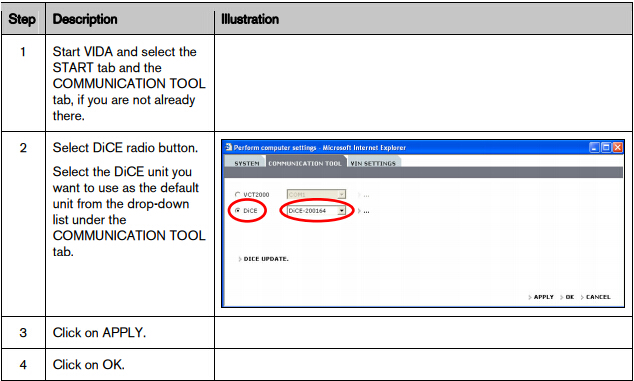
1.7 Choose default communication tool in VIDA
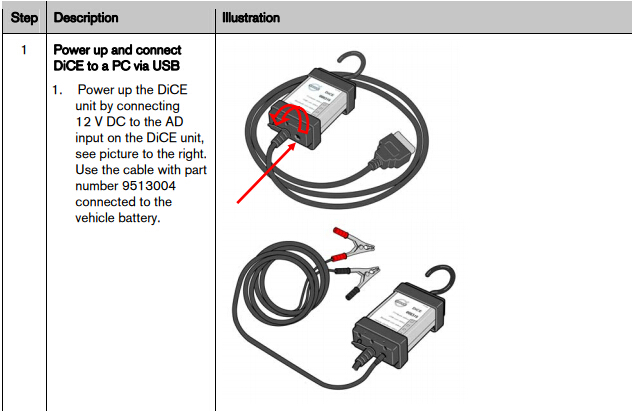
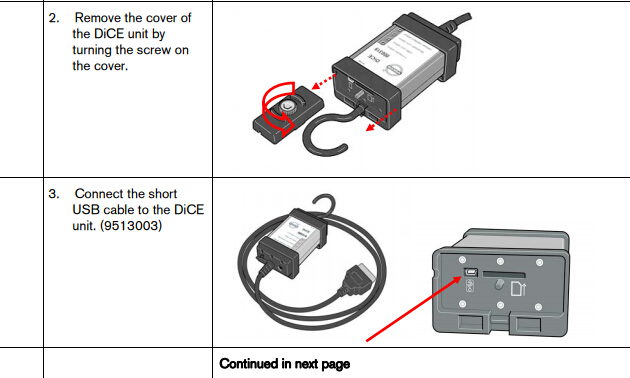
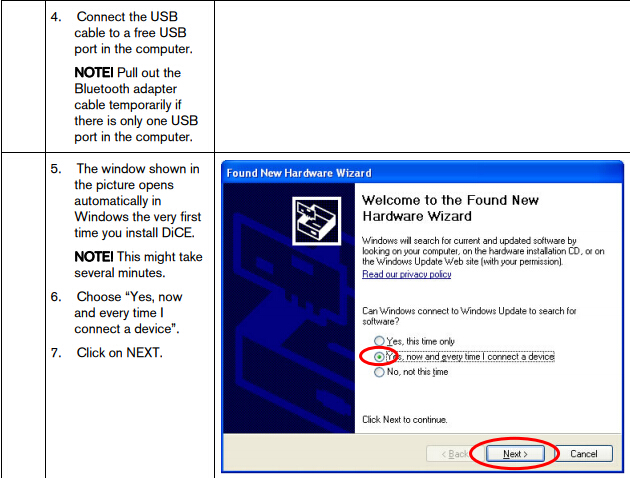
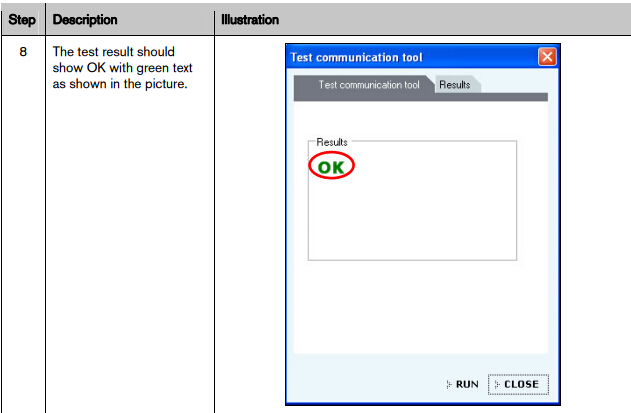
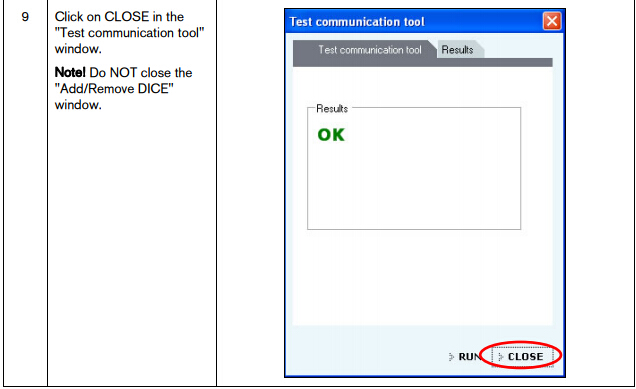
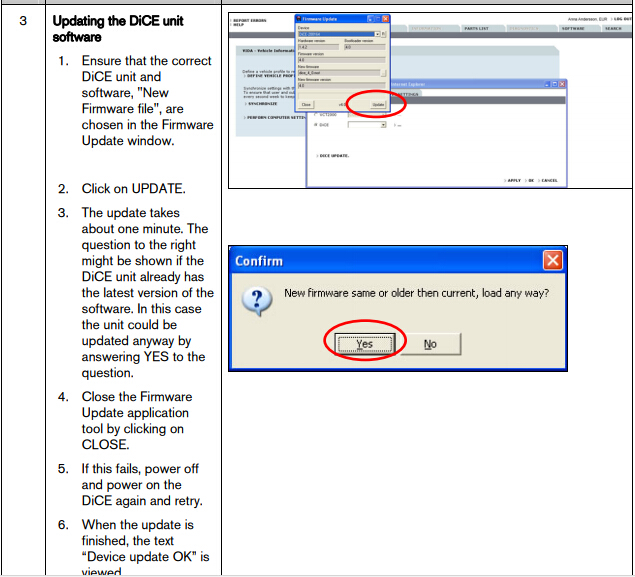
1.8 Check and update of internal software in DiCE unit
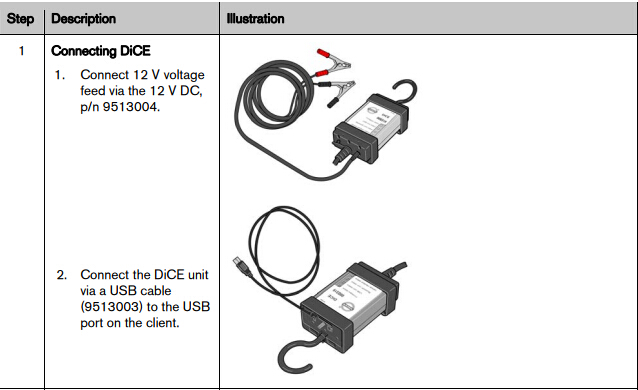
Updating of the internal software (also called Firmware) in a DiCE unit is done via the VIDA All-in-one client. When updating the firmware, the DiCE unit shall be connected with a USB cable and 12 V power supply. Ensure that the Firmware status LED is flashing green.
USB connection is a safer data transmission than Bluetooth. Reliable transmission is important when updating the firmware.
See detailed instructions on next page.
1.9 Connecting Volvo DiCE to a vehicle
Connecting DiCE to a vehicle is very easy. Follow the steps below.
1. Ensure that the Bluetooth adapter or USB cable is connected to the VIDA client.
2. Always ensure that the vehicle is connected to a battery charger before connecting DiCE to the vehicle. DiCE is powered by the vehicle, not via USB.
3. Connect DiCE to the diagnostic socket or OBD connector in the vehicle. Hang unit where it is visible or place on the roof top through the driver's window. Put the ignition key in position II.
4. Start VIDA All-in-One.
5. Ensure that the correct DiCE unit serial number is chosen in VIDA.
6. Choose the VEHICLE PROFILE tab in VIDA.
7. Click on READ VEHICLE to read the VIN number of the vehicle.
8. All other functions regarding vehicle diagnostics and software downloading remain the same as with VCT2000.
1.10 Removing a DiCE unit
All DiCE units that are installed and added to a VIDA client will become Communication tools that can be selected. To remove a DiCE unit, carry out the following:
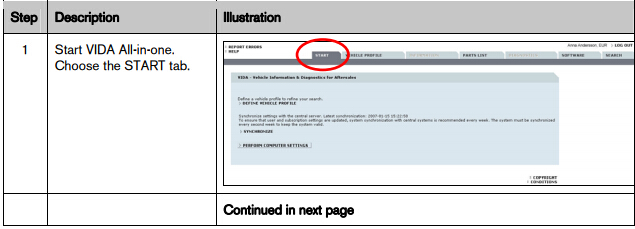
1. Start VIDA All-in-one. Select the START tab.
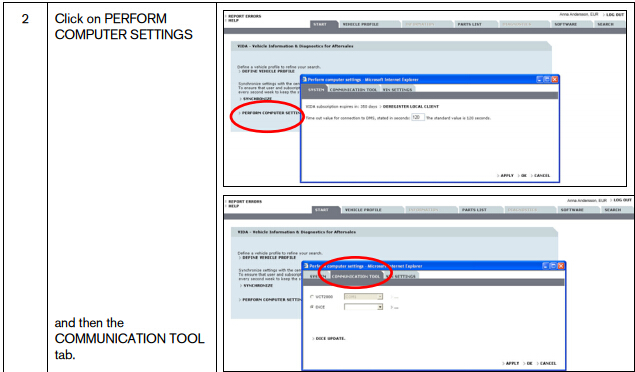
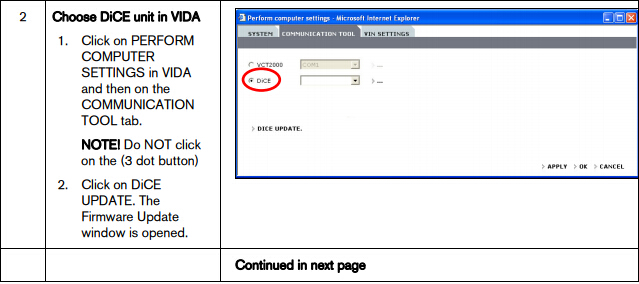
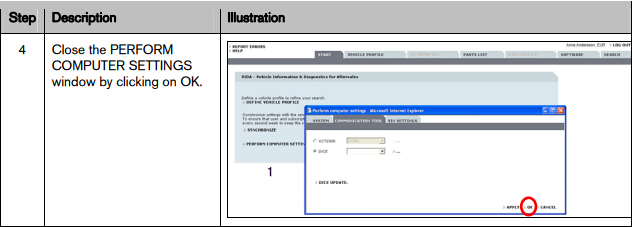
2. Click on PERFORM COMPUTER SETTINGS and then the COMMUNICATION TOOL tab.
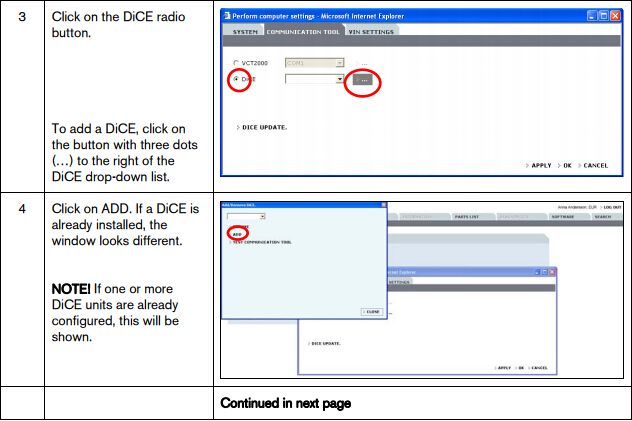
3. Click on the dots beside the DiCE option in the drop-down list for COMMUNICATION TOOL.
4. In the DiCE unit drop-down list, select a DiCE unit to be removed and click on REMOVE.
– Diagnostic Communication Equipment is a tool that is used together with VIDA All-in-One to communicate with the vehicle. Communication makes diagnosing and troubleshooting the vehicle possible, as well as the downloading of software.
Volvo VIDA DiCE uses Bluetooth to transfer information wirelessly between the vehicle and VIDA All-in-One. This gives the technicians more flexibility. A USB cable can be used as an alternative to Bluetooth.
1.1 Support For general support and questions concerning DiCE, submit a Help Request via www.volvotechinfo.com.
Getting started
1.2 Uninstalling built-in Bluetooth
If you have built-in Bluetooth on your client or Panasonic Toughbook CF30 (purchased prior to February 2008) it has to be uninstalled for DiCE to work properly.
1.3 Install the latest Vida edition
Install the latest version of VIDA and all applicable eUpdates, prior to beginning this installation process. The most current information concerning VIDA is available on Volvotechinfo.
1.4 Plug in of the supported Bluetooth USB adapter
Insert the Bluetooth adapter (9513005) along with the USB cable (9513007).Several installation images will appear, with the below image finally appearing:
Note! The only supporting Bluetooth adapter is the Volvo supplied adapter, part number 9513005.
1.5 Installation of USB driver for DiCE
For each new or additional DiCE unit that is going to be used in VIDA, the USB driver must be installed separately. This is done automatically in Windows when the DiCE unit is inserted into a USB port. Carry out the instructions below.
1.6 Adding the DiCE Unit into Volvo VIDA
To add a DiCE, carry out the following:
The DiCE unit is now configured for both USB and Bluetooth connection at the VIDA client. To set DiCE as the default communication tool, see section 1.7
NOTE! If DiCE is connected with a USB cable, the communication will always go through USB.
1.7 Choose default communication tool in VIDA
1.8 Check and update of internal software in DiCE unit
Updating of the internal software (also called Firmware) in a DiCE unit is done via the VIDA All-in-one client. When updating the firmware, the DiCE unit shall be connected with a USB cable and 12 V power supply. Ensure that the Firmware status LED is flashing green.
USB connection is a safer data transmission than Bluetooth. Reliable transmission is important when updating the firmware.
See detailed instructions on next page.
1.9 Connecting Volvo DiCE to a vehicle
Connecting DiCE to a vehicle is very easy. Follow the steps below.
1. Ensure that the Bluetooth adapter or USB cable is connected to the VIDA client.
2. Always ensure that the vehicle is connected to a battery charger before connecting DiCE to the vehicle. DiCE is powered by the vehicle, not via USB.
3. Connect DiCE to the diagnostic socket or OBD connector in the vehicle. Hang unit where it is visible or place on the roof top through the driver's window. Put the ignition key in position II.
4. Start VIDA All-in-One.
5. Ensure that the correct DiCE unit serial number is chosen in VIDA.
6. Choose the VEHICLE PROFILE tab in VIDA.
7. Click on READ VEHICLE to read the VIN number of the vehicle.
8. All other functions regarding vehicle diagnostics and software downloading remain the same as with VCT2000.
1.10 Removing a DiCE unit
All DiCE units that are installed and added to a VIDA client will become Communication tools that can be selected. To remove a DiCE unit, carry out the following:
1. Start VIDA All-in-one. Select the START tab.
2. Click on PERFORM COMPUTER SETTINGS and then the COMMUNICATION TOOL tab.
3. Click on the dots beside the DiCE option in the drop-down list for COMMUNICATION TOOL.
4. In the DiCE unit drop-down list, select a DiCE unit to be removed and click on REMOVE.
Subscribe to:
Posts (Atom)