Showing posts with label Volvo Dice install. Show all posts

2019/10/09

How to solve Volvo DiCE VIDA Communication Error?

Steps to test DiCE communication with VIDA:
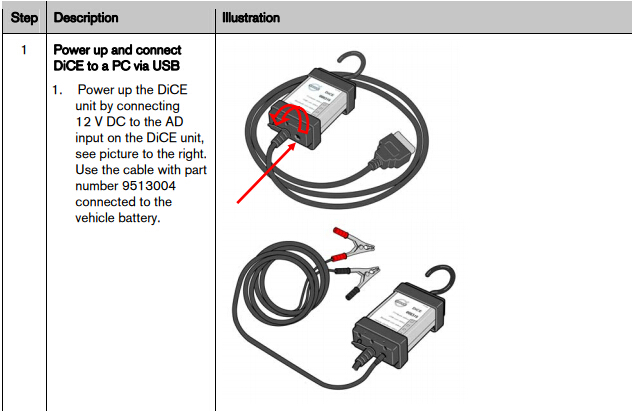
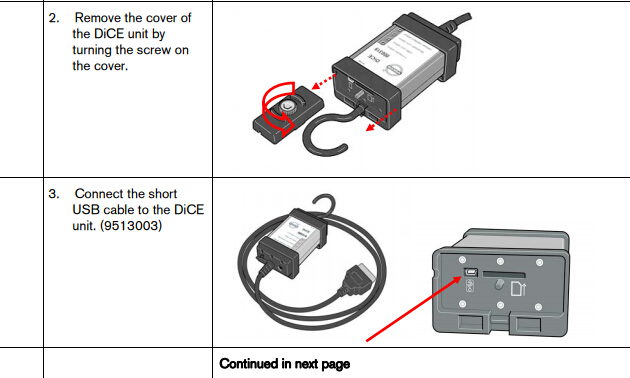
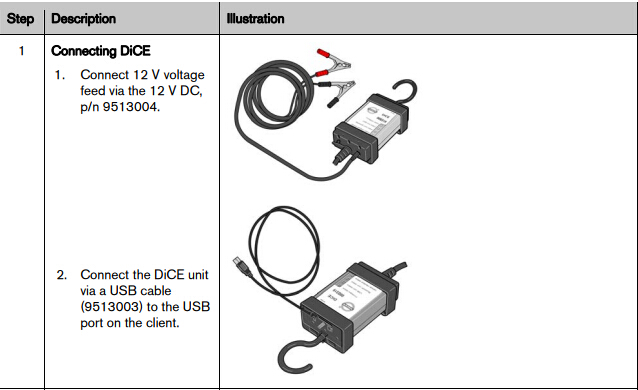
  1. Connect the DiCE unit by USB cable to your computer.
  2. Start VIDA.
  3. Open the Connected Vehicles tab.
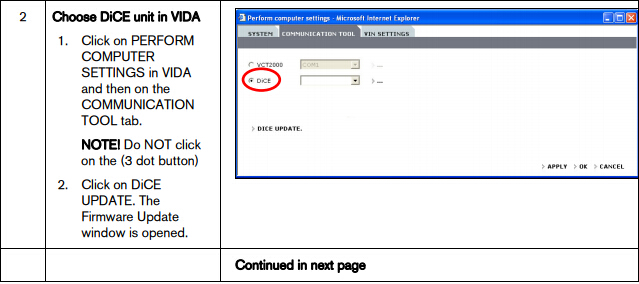
  4. Select the DiCE to be tested in the drop-down menu.
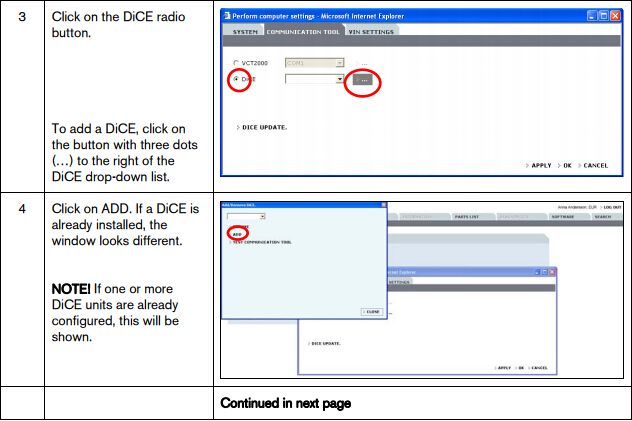
ðThe DiCE Configuration button appears.
volvo-vida-2014d-connection-1
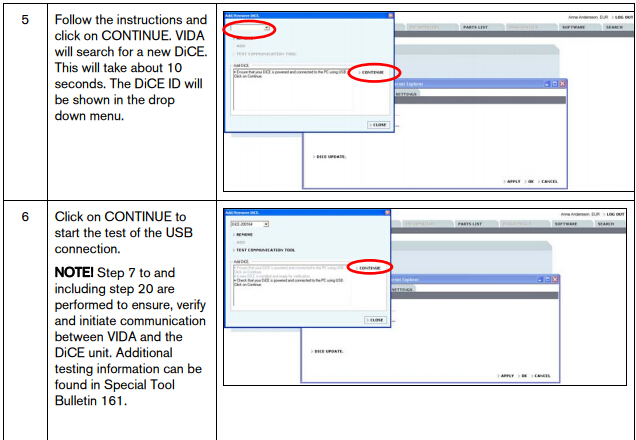
5. Click DiCE Configuration.
ðThe DiCE Configuration pop-up opens.
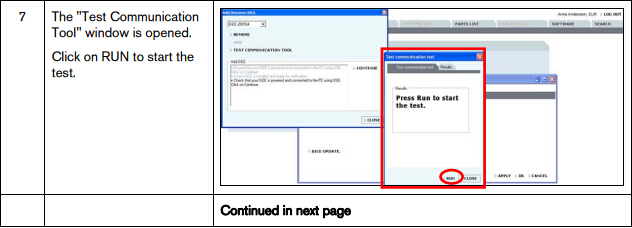
6. Click Test Communication Tool to start the test of the USB connection.
ðThe Test Communication Tool window is opened.
7. Select the communications to be tested by ticking the check boxes. By default, if no check boxes are ticked, the first eight elements are tested.
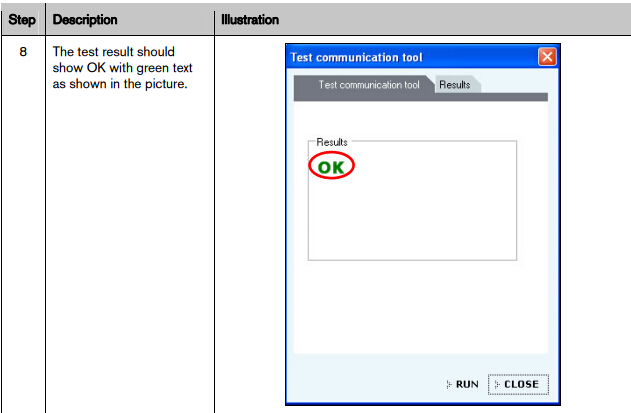
8. Click Run to start the test.
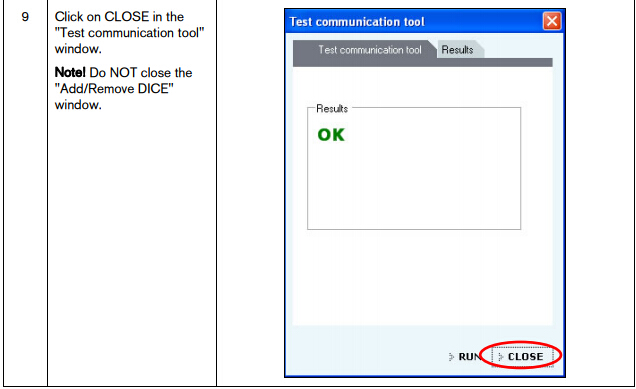
 OK should be displayed to the right for every row.
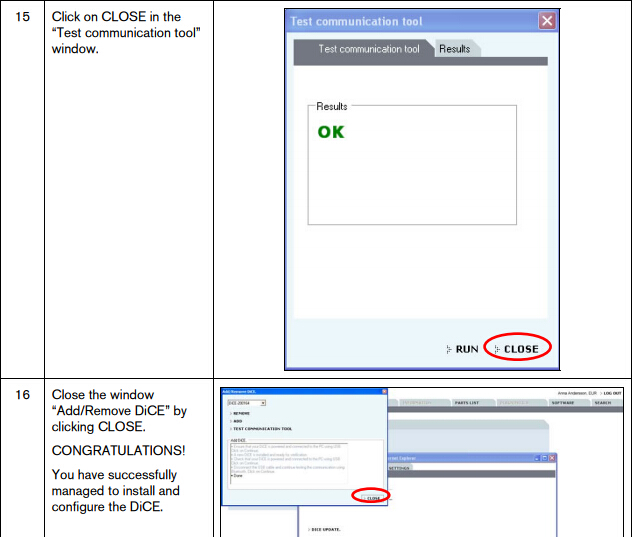
9. Click Close in the Test communication tool window.
Do not close the Test/Remove DiCE window.
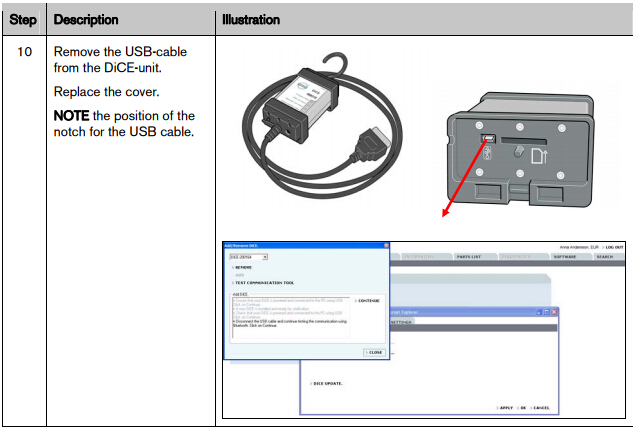
10.  Remove the USB cable from the DiCE unit.
volvo-vida-2014d-connection-2

The DiCE will now communicate via Bluetooth.
11. If you are using a computer with a built-in Bluetooth receiver, this receiver has to be disabled in order for the Bluetooth adapter to connect properly to your computer.
12. Press [WIN] + [R] on your keyboard.
The Run window opens.
13. Type devmgmt.msc and press [ENTER] .
At this point, a User Account Control pop-up window might open. In that case, click Yes.
The Device Manager opens.
14. Double click Bluetooth Radios.
15. Right click all devices listed under Bluetooth Radios and select Disable.
The built-in Bluetooth receiver(s) are disabled.
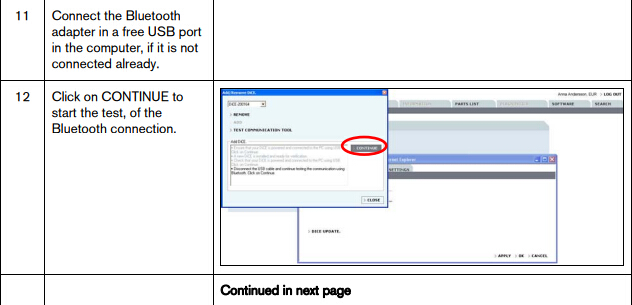
16. Connect the Bluetooth adapter to a free USB port on the computer.
17. In VIDA, click Test Communication Tool to start testing the Bluetooth connection.
18. Select which the communications to be tested by ticking the check boxes. By default, if no check boxes are ticked, the first eight elements are tested.
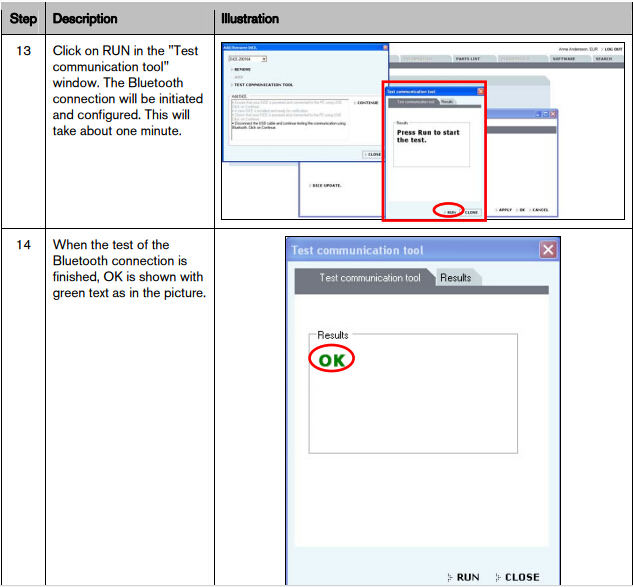
19. Click Run to start the test.
 OK should be displayed to the right of every row.
20. Click Close in the Test communication tool window.
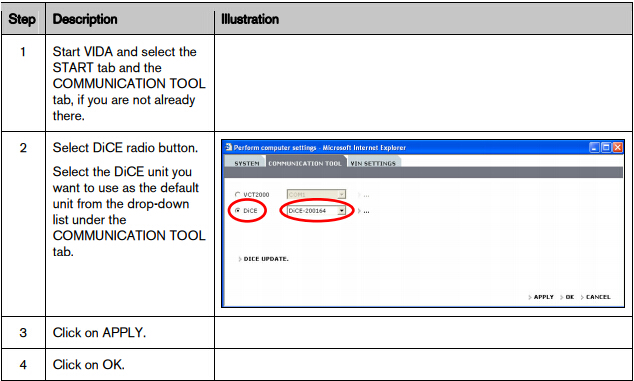
21. Click Close in the DiCE Configuration window.
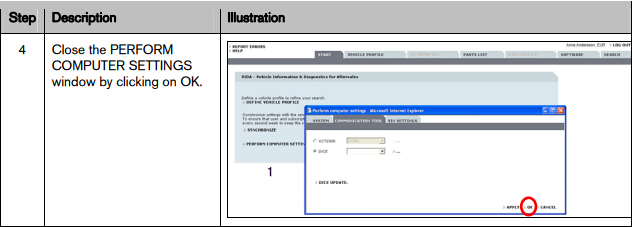
Close the DiCE Configuration window by clicking Close.
The DiCE unit is now configured for both USB and Bluetooth connection at the VIDA client.
If DiCE is connected with a USB cable, the communication will always go through the cable.

DiCE/VIDA questions and answers:

Q: When I plug Dice into the laptop after loading it, I can read the car and pick up the VIN and other info. I also pass the Dice diagnostic test in Vida. Car is plugged into a charger to keep the volts up.
However, when I finally try the Diagnostic Tab to read my ECU and other Volvo computer codes it always stalls and gives me an error once it gets to ‘’identifying AUU’’. It tells me I have a communication error… always, tried it in admin, 1, car running, car in position 2…. running out of options.
A: Solved!
So it was some sort of compatibility issue between my version of Vida and Dice…
Uninstalled everything, brought .NET to version 3.5. Installed Vida 2014D and we are up and running.

Q: The communication tool is completely blank with a red X. I have rolled back to framework 4.0 with no luck. If you find anything let us know.
A: Just wanted to update you that I have fixed my issue. And for anyone else with this issue here you go for windows 7 64.
Hold windows key + R. Type regedit. Go to Computer\HKEY_LOCAL_MACHINE\SOFTWARE\Wow6432Node\Microsoft\.NETFramework
Once there click on the .NETFramework file and you will see 2 values (Default) and InstallRoot. There should be a 3rd value.
Right click .NetFramework than go to new and down to DWord (32bit) and click it. Name the new one “EnableIEHosting” without the quotations. Than right click the item you just renamed and click modify. In the value type “00000001” without quotations. Should be seven 0s and a 1. Click ok.
Congrats. Relaunch the webpage login and you should be able to pick your tool.

Q: Win 7 Pro, 64bit. running IE8
DiCE is working fine in its test tool, VIDA is work fine on its own, but I can’t choose a communication tool…
A: SOLVED the problem (DICE not recognized). I found out since I have 2 separate laptops:
  1. Dell 2120 Windows 7 Ultimate 64-bit IE 9 was a no go: DICE not recognized.
The .Net Framework file could not be found (this is the culprit) so I could not uninstall it.
  1. Dell D630 Windows 7 Pro 32-bit IE 9:
Once I uninstall .Net Framework 4.6.1., DICE is recognized.
This may be why they say turn off Windows Update during installation of VIDA to prevent .Net Framework installation.
I don;t know if this is true, but uninstalling .Net Framework 4.6.1. SOLVED the problem.

PS: Ironically, for Windows XP and earlier version (such as VIDA 2013A etc.), I needed to install .Net Framework, it is weird!

Q: Just got Vida/Dice and installed 2012a fine on my Win 7 Pro laptop. Everything looks good, except when I open the dice diagnostics tool included, it doesn’t see any unit connected. When I plug the unit into my car or laptop, the firmware status and vehicle interface status both light up solid. When I try to read info from the car or do the dice test in vida, it fails saying it could not connect. Device manager says the unit is working correctly and the drivers all installed fine.
I looked through the log and all I could find was this, where it repeatedly mentions “Invalid Device ID.
VIDA release: VIDA2012A
A: Solved this finally, after about 10-15 hours of frustration. Turns out the DICE unit I purchased is a cheaper version that uses some non-standard driver (CP2102 USB to UART Bridge Controller available here: http://www.silabs.com/products/mcu/P…CPDrivers.aspx) that I had to find and install myself. It also would not work on Windows 7 Pro, I had to install to XP mode which was an ever bigger pain due to incredible instability. I think the fact that I have an AMD processor and needed a hotfix to even get XP mode to work contributed to it, but if I changed the RAM for XP mode to anything other than 512MB, the virtual PC would reboot constantly. So I had to copy the entire VIDA 2012A DVD to my desktop (about 2 hours) and then modify the installation file to eliminate the 2GB RAM requirement check, and then install VIDA (about 3 hours). VIDA 2012A runs fine with only 512MB RAM, just a lot slower.
If your DICE unit is cheap and has only blue LEDs and when plugged in the Firmware Status LED is solid, you probably are going to need to download that driver to get it to work.
Hope this helps someone in the future.


2018/03/26

How to install Volvo VIDA DiCE 2014D 2 Software CDs

Volvo VIDA DiCE diagnostic scanner new package comes with 2 software DVDs/CDs (old package comes with 1 software CD only). Setting up 2 software CDs is different from 1 CD. 


Note: If you have only 1 software CD, follow instruction here to install VIDA 2014D.
http://vidadice.blogspot.com/2017/11/install-volvo-vida-dice-2014d-on-windows-7.html


If you have 2 software CDs in DiCE package, follow guide below to install software.


How to install Volvo VIDA 2014D with 2 Software CDs on Windows 7 64 bit?


Volvo Vida Dice Requirement on computer:

1. It must be Windows 7 professional operating system
2. It need to be Internet Explorer 9 !!!
3. Computer memory needs to over 3GRAM
4. C:// must have 40GB space
5. Software must be installed under C://
6. It must be NTFS format


Step 1: Install VIDA Setup

Launch Windows Internet Explorer 9
Click on Setup->About Internet Explorer
install-vida-2014d-2cd-1

Delete IE9 Windows 7 x86 enu shortcut on desktop

Open VIDA2014.1 software CD

Copy VIDA2014D.part1 and paste it to Computer/Software (D:)
install-vida-2014d-2cd-2

Open VIDA2014D.2 software CD

Copy VIDA2014D.part2 and paste it to Computer/Disk D
install-vida-2014d-2cd-3

Then extra VIDA2014D.part1 zip file

Open VIDA2014D.part1 folder

Copy and paste Patch VIDA 2014-A-B-C-D to desktop
install-vida-2014d-2cd-4

Open Software (D:)/VIDA2014D folder->Install->DVD->Vida_dvdheader->Main

Run Setup as Administrator 
install-vida-2014d-2cd-5


Install VIDA setup

Select VIDA All-in-one, press Next
install-vida-2014d-2cd-6


Select software language
install-vida-2014d-2cd-7


Choose destination location C://VIDA/, press Next
install-vida-2014d-2cd-8


Accept license agreement,press Next

Installing Framework35

VIDA installation in progress. Wait until the installation is completed

Installation complete will generate a few files on desktop
install-vida-2014d-2cd-9


open Vida Configurator

Select connection type to central systems as "Internet" and Save
install-vida-2014d-2cd-10

VIDA Setup finished, select restart computer later
install-vida-2014d-2cd-11

Step 2: Install Patch VIDA 2014D


Extra Patch VIDA zip file and paste patch 2014A.exe on desktop
install-vida-2014d-2cd-12

Install patch, select destination folder to C://,press Install

Connect Volvo DiCE interface with computer via USB port System will automatically install the driver DiCE-206751 @ 000000000000 device driver successfully installed

Allow windows firewall access

Delete Patch, Adobe Reader XI and 2014A.exe on desktop
install-vida-2014d-2cd-13

Step 3: Run Self Test

Run Vida All-in-one as Administrator
install-vida-2014d-2cd-14


Enter Username:1 and log in
Open Computer->Manager->Device Manager->DiCE Hardware to check scanner is well connected 
install-vida-2014d-2cd-15


Define vehicle profile

Select Communication Tool: DiCE-206751

Press DICE Configuration->Test Communication Tool
install-vida-2014d-2cd-16
Click Run to run self test
install-vida-2014d-2cd-17


Self test okay

Connect DiCE unit with vehicle

Read vehicle information and run diagnostic function 
install-vida-2014d-2cd-18
install-vida-2014d-2cd-19

2017/11/30

2 Ways to Install Volvo VIDA 2014D on Window 10

VIDA is a catalog of parts with a variety of instructions and manuals. Also, diagnostics, maintenance and adjustment of some parameters will be available using DiCE .
Below is a small example of working with VIDA 2014D and Volvo DiCE , and also described TWO ways of installing TWO variants (original and repack) of VIDA on Windows 10 (also installed on Windows 8.1). Additionally, added options for solving common problems with / after installation and some useful settings.
(The document was translated from Russian forum)
Volvo VIDA 2014D is the last (not the last) file version of VIDA available locally, i.e. installed and running on a separate PC. Accordingly, available to a simple user.
Since the beginning of 2015, the program is only online!
volvo-vida-dice-win10-1
Temporary workplace is ready.
Example of using VIDA + DiCE – diagnostics and error removal
volvo-vida-dice-win10-2
Start, enter 4 to enter the EUR region.
volvo-vida-dice-win10-3
We read the car.
volvo-vida-dice-win10-4
The Diagnostics section, the Details tab.
volvo-vida-dice-win10-5
The Diagnostics section, the Network tab.
volvo-vida-dice-win10-6
The Diagnostics section, the Troubleshooting tab.
On the Troubleshooting tab, the module with errors is highlighted in red (green – everything is normal, gray – missing / not installed). Select it with the mouse, below it will be a list of errors. Select the line – the information about the error appears. With a double-click – a window opens with the expanded info. Before erasing – carefully read. Go to the Delivery tab , at the bottom there will be actions – Erase everything and Erase
volvo-vida-dice-win10-7
The existing CEM module error.
volvo-vida-dice-win10-8
The window with the expanded information by mistake and recommendations on elimination.

The existing error is nothing more than the LED license plate lights that I have installed. So, while these lamps are standing – there will be a fault, it does not lead to the device and it makes no sense to erase at the moment.
volvo-vida-dice-win10-9
The Diagnostics section, the Reference tab.
volvo-vida-dice-win10-10
Diagnostics section, Maintenance tab.

How to install Volvo VIDA 2014D on a PC with Windows 8.1 / 10 Pro / Core x86 / x64
-This instruction for installing VIDA 2014D from an .iso image (or from a folder) on a PC with Windows 10x86-x64 of all versions and versions (as of 08.10.2016). Suitable for Windows 8 of all versions and versions.
In Windows 7, install the usual way – run \ Install \ DVD \ Vida_dvdheader \ Main \ setup.exe
-If you have an image without the Russian language (and it is needed) – unpack the image by any archiver into a folder (for example VIDA2014D), download the archive at the end of the post , create the folder ru-RU in VIDA2014D \ DB , put the downloaded archive servicerep_ru-RU.zip into it , you can start the installation.
-If the PC has 2GB of RAM, 20GB of hard disk space (3GB and 30GB for 2014D) and less, you need to unpack the image and make the appropriate changes to the file \ VIDA2014D \ Install \ DVD \ Vida_dvdheader \ Compinfo.ini , in the lines Win7MinValue = write 512 , in Win7 Recommend = write 5,000,000 (or erase one digit at the end), save.
-If the PC is shaken by unsuccessful attempts to install different versions of VIDA – it is necessary to prepare for the new installation, clean up the OS (uninstall the components VIDA, SQL, remove the remaining folders, remove the remaining keys in the registry).

Method 1

1 . Preparation.
There is nothing to install additionally, except as specified in this manual. Also, there is NO need to disable / stop any of the default components in Windows 10 (defender, firewall, etc.).
a ) Install the .NET Framework 3.5 from:
– Control Panel – Programs and Features – Turn Windows features on or off
In the Windows Components window , note .NET Framework 3.5 , then OK , the .NET Framework 3.5will be loaded and installed , you may need to restart. If already installed, go to the next step.
b) Insert the image into the virtual drive (in Windows 10 it is present by default) by double clicking on VIDA2014D.iso .
Open the explorer folder with the image.
c ) Run cmd from the administrator from the open folder with the image VIDA2014D:
– File – Open the command line – Open the command line as an administrator
Before finishing the installation DO NOT close the cmd window , we need it twice.
volvo-vida-dice-win10-11
2 . Install and configure Microsoft SQL Server 2008 R2 .
Copy / paste into the cmd window and press Enter :
“3PP \ Products \ SqlExpress \ SQLEXPR_x86_ENU.exe” / ACTION = Install / IACCEPTSQLSERVERLICENSETERMS / ROLE = AllFeatures_WithDefaults / INSTANCENAME = VIDA / SAPWD = GunnarS3g3 / SECURITYMODE = SQL / SQLSVCACCOUNT = “NT AUTHORITY \ SYSTEM” / BROWSERSVCSTARTUPTYPE = Automatic / TCPENABLED = 1 / HIDECONSOLE / ENU / QS
Wait until the installation is complete. You can check the correctness of the previous installation in:
– Start – All applications – Microsoft SQL Server 2008 R2 – SQL Server Installation Center – Tools – Installed SQL Server features discovery report
The default browser with the report will open. Look – there are two lines in the table (at the end of No, it should be), close the SQL Server Installation Center .
volvo-vida-dice-win10-12
3 . Installation of VIDA 2014D .
Copy / paste OBE lines to the cmd window and press Enter :
set __compat_layer = WIN7RTM
“Install \ DVD \ Vida_dvdheader \ Main \ setup.exe”
Select VIDA All-in-one .
Choose only ONE language (install TWO languages ​​and switch them you can – see Method 2 ).
Accept the license agreement.
Choose the installation path. It is recommended to leave it as default.
Installation takes a long time. You can control in the Task Manager by the activity of the alba process . At the end of the installation, icons appear on the desktop.
Select in the pop-up window Internet , then Save , then Close , and again Close .
Refuse to reboot.
Close the cmd window .
4 . Treatment and first run.
Run 2014A-BD.exe from the administrator. If you changed the default VIDA installation path, change only the LETTER drive in the opened window (if you installed it to the root of another disk / partition). Select Install , VIDA Monitor should start after that , after some time its icon in the tray should have a green arrow instead of a yellow arrow.
In the pop-up window of the regular firewall, select Allow access for Java.
Start VIDA with the VIDA All-in-One icon on the desktop (or in the Start menu, or right-click on the VIDA Monitor icon in the tray).
If Internet Explorer prompts you to select and enable add-ins, enable it.
Enter in the fieldUsername : 4 for Europe region (others – 1, 2, 3).
Wait for IsoView to load .
Click the Vehicle Profile tab , enter the VIN code. There should be a car. If Write Access is denied – check and enter the VIN code manually (NOT through copy / paste).
Disable VIDA eUpdate in the Task Manager on the Startup tab , the Java ™ Platform SE binary line .
You can also disable VIDA Monitor from startup and run it as needed from the shortcut to Start – VIDA .
Adobe Reader XI, which was installed with VIDA, can be deleted (if you use another application for pdf or not needed).
Done, you can use.
* If the server does not start – after a while on the icon appears red “?”, The fault is the update KB3163018or 1607 AU . Download the archive with the folder jdk , unload VIDA Monitor, delete the folder jdk from C: \ VIDA , unpack downloaded to C: \ VIDA , then reboot the PC. Archive with the necessary, to solve this problem, you can download at the end of the post.
* If the Username field is NOT active– the tablet did not work, apply again (after unloading the VIDA Monitor ) carefully following all the conditions, then restart the PC. Another option is to unpack the contents of 2014A-BD.exe into C: \ VIDA by agreeing to the replacement. Start from the administrator C: \ VIDA \ patch \ filldb.cmd (previously unloading the VIDA Monitor ).

Method 2 (recommended)

– At the bottom of the post there is a link to the resource where you can download the ready version with the adaptation to the extreme update of Windows 10 and the ability to use two languages ​​- Russian and English. Contains an easy way to install with cmd files (nothing needs to be entered manually). Everything necessary for installation and normal operation on Windows 10 is already in the image.
Correction of the “cross” in the field “Communication tool”
If after starting, in the field “Communication tool” – a cross , you must run the reg.file from \ Install \ Utilson the image / disk with VIDA EnableIEHostingx86.reg or EnableIEHostingx64.reg (for x64 OS).
Done.
IE must be closed! Archive with the necessary files, to solve this problem, you can download at the end of the post.
Connecting and installing DiCE
If you plan to use Volvo VIDA DiCE:
– Connect the device to the OBD connector of the car (or supply it with power 5-12 V / 1-2 A suitable BP, dais does not get power via USB!).
– Connect it to the USB connector of the PC.
– Wait for the device to be installed in Windows.
– Start VIDA, make sure that DiCE is installed in the “Communication tool” field.
Done.
If you want to use DiCE on bluetooth (first necessarily connect via USB!), Run (corresponding to the bit depth of the OS) reg.file and search / add devices WT to the OS. The manual with the necessary reg.file for connection on bluetooth and driver for using DiCE without VIDA can be downloaded at the end of the post.
To check the device, use the regular DiCE Diagnostic utility in – Start – All applications – DiCE .
Installing EWD schemas in VIDA
To scheme EWD were available from VIDA , you must copy the contents of a folder Rus from the disc (image) in the EWD:
\ VIDA \ the jboss \ the standalone \ deployments \ VidaEar.ear \ VidaWeb.war \ wiring_diagrams \ Rus
When a disc / image EWD no folder Rus – copy the contents from, for example, US_Eng , in diagrams and in “English” everything is clear Copy it to the Rus folder , if VIDA is in Russian (if there is no such folder, create it). After restarting VIDA Monitor.
Done.
Are in the Information – Troubleshooting – Wiring diagrams .
– At the bottom of the post there is a link to the resource where you can download EWD .
volvo-vida-dice-win10-13
EWD 2014D
Access to VIDA over the network
For VIDA to be available over the network, you need to stop VIDA Monitor, change the line in the file:
VIDA \ jboss \ standalone \ configuration \ standalone.xml
<interface name = “public”>
inet-address value = “$ {jboss.bind.address : 127.0.0.1} “ />
</ interface>

to:
<interface name =” public “>
any-ipv4-address />
</ interface>

Then run VIDA Monitor (or restart the PC). On another PC, you need to install the accompanying software – IsoView and the DiCE driver (if needed there). From this PC (in the local network, VPN, etc.) in IE, enter the address of the PC with VIDA – * IP of the computer * / Vida (for example 192.168.1.25/Vida) or create a shortcut with the object “C:computer * / Vida.
Done.
How to delete car profiles that have already been read / entered
Run the file:
\ VIDA \ db \ dbutils \ clearDatabase.bat
Done.
All profiles are deleted! Separately, there is no way to delete. After, it is necessary to apply the tablet again .
volvo-vida-dice-win10-14
VIDA 2014D on Windows 10
volvo-vida-dice-win10-15
VIDA 2014D on Windows 8.1


Ways to solve problems with installation and startup on Windows 8.1 / 10 are taken HERE

2017/11/29

Volvo DiCE Unit Installation Instruction

1.0 Introduction DiCE

– Diagnostic Communication Equipment is a tool that is used together with VIDA All-in-One to communicate with the vehicle. Communication makes diagnosing and troubleshooting the vehicle possible, as well as the downloading of software.


Volvo VIDA DiCE uses Bluetooth to transfer information wirelessly between the vehicle and VIDA All-in-One. This gives the technicians more flexibility. A USB cable can be used as an alternative to Bluetooth.


1.1 Support For general support and questions concerning DiCE, submit a Help Request via www.volvotechinfo.com.


Getting started


1.2 Uninstalling built-in Bluetooth

If you have built-in Bluetooth on your client or Panasonic Toughbook CF30 (purchased prior to February 2008) it has to be uninstalled for DiCE to work properly.


1.3 Install the latest Vida edition

Install the latest version of VIDA and all applicable eUpdates, prior to beginning this installation process. The most current information concerning VIDA is available on Volvotechinfo.

1.4 Plug in of the supported Bluetooth USB adapter

Insert the Bluetooth adapter (9513005) along with the USB cable (9513007).Several installation images will appear, with the below image finally appearing:

Note! The only supporting Bluetooth adapter is the Volvo supplied adapter, part number 9513005.


1.5 Installation of USB driver for DiCE

For each new or additional DiCE unit that is going to be used in VIDA, the USB driver must be installed separately. This is done automatically in Windows when the DiCE unit is inserted into a USB port. Carry out the instructions below.


1.6 Adding the DiCE Unit into Volvo VIDA


To add a DiCE, carry out the following:


The DiCE unit is now configured for both USB and Bluetooth connection at the VIDA client. To set DiCE as the default communication tool, see section 1.7

NOTE! If DiCE is connected with a USB cable, the communication will always go through USB.


1.7 Choose default communication tool in VIDA


1.8 Check and update of internal software in DiCE unit

Updating of the internal software (also called Firmware) in a DiCE unit is done via the VIDA All-in-one client. When updating the firmware, the DiCE unit shall be connected with a USB cable and 12 V power supply. Ensure that the Firmware status LED is flashing green.

USB connection is a safer data transmission than Bluetooth. Reliable transmission is important when updating the firmware.

See detailed instructions on next page.


1.9 Connecting Volvo DiCE to a vehicle

Connecting DiCE to a vehicle is very easy. Follow the steps below.

1. Ensure that the Bluetooth adapter or USB cable is connected to the VIDA client.

2. Always ensure that the vehicle is connected to a battery charger before connecting DiCE to the vehicle. DiCE is powered by the vehicle, not via USB.

3. Connect DiCE to the diagnostic socket or OBD connector in the vehicle. Hang unit where it is visible or place on the roof top through the driver's window. Put the ignition key in position II.

4. Start VIDA All-in-One.

5. Ensure that the correct DiCE unit serial number is chosen in VIDA.

6. Choose the VEHICLE PROFILE tab in VIDA.

7. Click on READ VEHICLE to read the VIN number of the vehicle.

8. All other functions regarding vehicle diagnostics and software downloading remain the same as with VCT2000.


1.10 Removing a DiCE unit


All DiCE units that are installed and added to a VIDA client will become Communication tools that can be selected. To remove a DiCE unit, carry out the following:

1. Start VIDA All-in-one. Select the START tab.

2. Click on PERFORM COMPUTER SETTINGS and then the COMMUNICATION TOOL tab.

3. Click on the dots beside the DiCE option in the drop-down list for COMMUNICATION TOOL.

4. In the DiCE unit drop-down list, select a DiCE unit to be removed and click on REMOVE.