Showing posts with label Vida All-in-one. Show all posts

2018/03/26

How to install Volvo VIDA DiCE 2014D 2 Software CDs

Volvo VIDA DiCE diagnostic scanner new package comes with 2 software DVDs/CDs (old package comes with 1 software CD only). Setting up 2 software CDs is different from 1 CD. 


Note: If you have only 1 software CD, follow instruction here to install VIDA 2014D.
http://vidadice.blogspot.com/2017/11/install-volvo-vida-dice-2014d-on-windows-7.html


If you have 2 software CDs in DiCE package, follow guide below to install software.


How to install Volvo VIDA 2014D with 2 Software CDs on Windows 7 64 bit?


Volvo Vida Dice Requirement on computer:

1. It must be Windows 7 professional operating system
2. It need to be Internet Explorer 9 !!!
3. Computer memory needs to over 3GRAM
4. C:// must have 40GB space
5. Software must be installed under C://
6. It must be NTFS format


Step 1: Install VIDA Setup

Launch Windows Internet Explorer 9
Click on Setup->About Internet Explorer
install-vida-2014d-2cd-1

Delete IE9 Windows 7 x86 enu shortcut on desktop

Open VIDA2014.1 software CD

Copy VIDA2014D.part1 and paste it to Computer/Software (D:)
install-vida-2014d-2cd-2

Open VIDA2014D.2 software CD

Copy VIDA2014D.part2 and paste it to Computer/Disk D
install-vida-2014d-2cd-3

Then extra VIDA2014D.part1 zip file

Open VIDA2014D.part1 folder

Copy and paste Patch VIDA 2014-A-B-C-D to desktop
install-vida-2014d-2cd-4

Open Software (D:)/VIDA2014D folder->Install->DVD->Vida_dvdheader->Main

Run Setup as Administrator 
install-vida-2014d-2cd-5


Install VIDA setup

Select VIDA All-in-one, press Next
install-vida-2014d-2cd-6


Select software language
install-vida-2014d-2cd-7


Choose destination location C://VIDA/, press Next
install-vida-2014d-2cd-8


Accept license agreement,press Next

Installing Framework35

VIDA installation in progress. Wait until the installation is completed

Installation complete will generate a few files on desktop
install-vida-2014d-2cd-9


open Vida Configurator

Select connection type to central systems as "Internet" and Save
install-vida-2014d-2cd-10

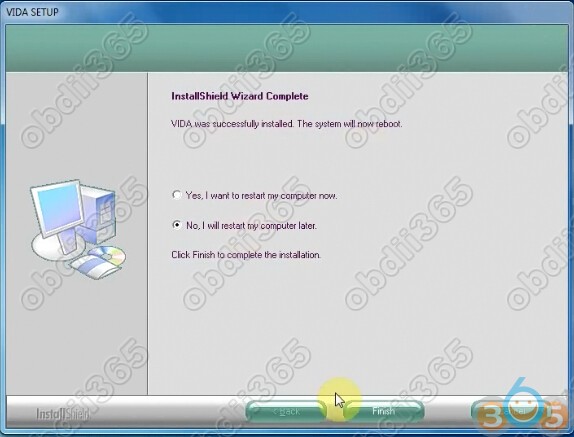
VIDA Setup finished, select restart computer later
install-vida-2014d-2cd-11

Step 2: Install Patch VIDA 2014D


Extra Patch VIDA zip file and paste patch 2014A.exe on desktop
install-vida-2014d-2cd-12

Install patch, select destination folder to C://,press Install

Connect Volvo DiCE interface with computer via USB port System will automatically install the driver DiCE-206751 @ 000000000000 device driver successfully installed

Allow windows firewall access

Delete Patch, Adobe Reader XI and 2014A.exe on desktop
install-vida-2014d-2cd-13

Step 3: Run Self Test

Run Vida All-in-one as Administrator
install-vida-2014d-2cd-14


Enter Username:1 and log in
Open Computer->Manager->Device Manager->DiCE Hardware to check scanner is well connected 
install-vida-2014d-2cd-15


Define vehicle profile

Select Communication Tool: DiCE-206751

Press DICE Configuration->Test Communication Tool
install-vida-2014d-2cd-16
Click Run to run self test
install-vida-2014d-2cd-17


Self test okay

Connect DiCE unit with vehicle

Read vehicle information and run diagnostic function 
install-vida-2014d-2cd-18
install-vida-2014d-2cd-19

2018/01/10

Volvo VIDA DiCE 2014D failed to login Solution

Free download VIDA 2014D patch when you fail to log in.

Volvo VIDA Dice 2014D cannot log in:
When the user name is entered, the interface will pop up “please wait” and jump into a blank page for seconds, then back to the login interface.
volvo-vida-2014d-fail-login-1

volvo-vida-2014d-fail-login-2

volvo-vida-2014d-fail-login-3

volvo-vida-2014d-fail-login-4
 If your computer date/time is newer than 31/12/2018 and you fails to login VIDA All-in-one, please download patch here:
Run Patch.cmd and Vida 2014D works like a charm
volvo-vida-failed-login-solution
Note: this patch only works for VIDA 2014D; cannot be used for VIDA 2014A

Tech support from obdii365.com

http://blog.obdii365.com/2018/01/10/solved-volvo-vida-2014d-cannot-log-in/

2017/11/30

2 Ways to Install Volvo VIDA 2014D on Window 10

VIDA is a catalog of parts with a variety of instructions and manuals. Also, diagnostics, maintenance and adjustment of some parameters will be available using DiCE .
Below is a small example of working with VIDA 2014D and Volvo DiCE , and also described TWO ways of installing TWO variants (original and repack) of VIDA on Windows 10 (also installed on Windows 8.1). Additionally, added options for solving common problems with / after installation and some useful settings.
(The document was translated from Russian forum)
Volvo VIDA 2014D is the last (not the last) file version of VIDA available locally, i.e. installed and running on a separate PC. Accordingly, available to a simple user.
Since the beginning of 2015, the program is only online!
volvo-vida-dice-win10-1
Temporary workplace is ready.
Example of using VIDA + DiCE – diagnostics and error removal
volvo-vida-dice-win10-2
Start, enter 4 to enter the EUR region.
volvo-vida-dice-win10-3
We read the car.
volvo-vida-dice-win10-4
The Diagnostics section, the Details tab.
volvo-vida-dice-win10-5
The Diagnostics section, the Network tab.
volvo-vida-dice-win10-6
The Diagnostics section, the Troubleshooting tab.
On the Troubleshooting tab, the module with errors is highlighted in red (green – everything is normal, gray – missing / not installed). Select it with the mouse, below it will be a list of errors. Select the line – the information about the error appears. With a double-click – a window opens with the expanded info. Before erasing – carefully read. Go to the Delivery tab , at the bottom there will be actions – Erase everything and Erase
volvo-vida-dice-win10-7
The existing CEM module error.
volvo-vida-dice-win10-8
The window with the expanded information by mistake and recommendations on elimination.

The existing error is nothing more than the LED license plate lights that I have installed. So, while these lamps are standing – there will be a fault, it does not lead to the device and it makes no sense to erase at the moment.
volvo-vida-dice-win10-9
The Diagnostics section, the Reference tab.
volvo-vida-dice-win10-10
Diagnostics section, Maintenance tab.

How to install Volvo VIDA 2014D on a PC with Windows 8.1 / 10 Pro / Core x86 / x64
-This instruction for installing VIDA 2014D from an .iso image (or from a folder) on a PC with Windows 10x86-x64 of all versions and versions (as of 08.10.2016). Suitable for Windows 8 of all versions and versions.
In Windows 7, install the usual way – run \ Install \ DVD \ Vida_dvdheader \ Main \ setup.exe
-If you have an image without the Russian language (and it is needed) – unpack the image by any archiver into a folder (for example VIDA2014D), download the archive at the end of the post , create the folder ru-RU in VIDA2014D \ DB , put the downloaded archive servicerep_ru-RU.zip into it , you can start the installation.
-If the PC has 2GB of RAM, 20GB of hard disk space (3GB and 30GB for 2014D) and less, you need to unpack the image and make the appropriate changes to the file \ VIDA2014D \ Install \ DVD \ Vida_dvdheader \ Compinfo.ini , in the lines Win7MinValue = write 512 , in Win7 Recommend = write 5,000,000 (or erase one digit at the end), save.
-If the PC is shaken by unsuccessful attempts to install different versions of VIDA – it is necessary to prepare for the new installation, clean up the OS (uninstall the components VIDA, SQL, remove the remaining folders, remove the remaining keys in the registry).

Method 1

1 . Preparation.
There is nothing to install additionally, except as specified in this manual. Also, there is NO need to disable / stop any of the default components in Windows 10 (defender, firewall, etc.).
a ) Install the .NET Framework 3.5 from:
– Control Panel – Programs and Features – Turn Windows features on or off
In the Windows Components window , note .NET Framework 3.5 , then OK , the .NET Framework 3.5will be loaded and installed , you may need to restart. If already installed, go to the next step.
b) Insert the image into the virtual drive (in Windows 10 it is present by default) by double clicking on VIDA2014D.iso .
Open the explorer folder with the image.
c ) Run cmd from the administrator from the open folder with the image VIDA2014D:
– File – Open the command line – Open the command line as an administrator
Before finishing the installation DO NOT close the cmd window , we need it twice.
volvo-vida-dice-win10-11
2 . Install and configure Microsoft SQL Server 2008 R2 .
Copy / paste into the cmd window and press Enter :
“3PP \ Products \ SqlExpress \ SQLEXPR_x86_ENU.exe” / ACTION = Install / IACCEPTSQLSERVERLICENSETERMS / ROLE = AllFeatures_WithDefaults / INSTANCENAME = VIDA / SAPWD = GunnarS3g3 / SECURITYMODE = SQL / SQLSVCACCOUNT = “NT AUTHORITY \ SYSTEM” / BROWSERSVCSTARTUPTYPE = Automatic / TCPENABLED = 1 / HIDECONSOLE / ENU / QS
Wait until the installation is complete. You can check the correctness of the previous installation in:
– Start – All applications – Microsoft SQL Server 2008 R2 – SQL Server Installation Center – Tools – Installed SQL Server features discovery report
The default browser with the report will open. Look – there are two lines in the table (at the end of No, it should be), close the SQL Server Installation Center .
volvo-vida-dice-win10-12
3 . Installation of VIDA 2014D .
Copy / paste OBE lines to the cmd window and press Enter :
set __compat_layer = WIN7RTM
“Install \ DVD \ Vida_dvdheader \ Main \ setup.exe”
Select VIDA All-in-one .
Choose only ONE language (install TWO languages ​​and switch them you can – see Method 2 ).
Accept the license agreement.
Choose the installation path. It is recommended to leave it as default.
Installation takes a long time. You can control in the Task Manager by the activity of the alba process . At the end of the installation, icons appear on the desktop.
Select in the pop-up window Internet , then Save , then Close , and again Close .
Refuse to reboot.
Close the cmd window .
4 . Treatment and first run.
Run 2014A-BD.exe from the administrator. If you changed the default VIDA installation path, change only the LETTER drive in the opened window (if you installed it to the root of another disk / partition). Select Install , VIDA Monitor should start after that , after some time its icon in the tray should have a green arrow instead of a yellow arrow.
In the pop-up window of the regular firewall, select Allow access for Java.
Start VIDA with the VIDA All-in-One icon on the desktop (or in the Start menu, or right-click on the VIDA Monitor icon in the tray).
If Internet Explorer prompts you to select and enable add-ins, enable it.
Enter in the fieldUsername : 4 for Europe region (others – 1, 2, 3).
Wait for IsoView to load .
Click the Vehicle Profile tab , enter the VIN code. There should be a car. If Write Access is denied – check and enter the VIN code manually (NOT through copy / paste).
Disable VIDA eUpdate in the Task Manager on the Startup tab , the Java ™ Platform SE binary line .
You can also disable VIDA Monitor from startup and run it as needed from the shortcut to Start – VIDA .
Adobe Reader XI, which was installed with VIDA, can be deleted (if you use another application for pdf or not needed).
Done, you can use.
* If the server does not start – after a while on the icon appears red “?”, The fault is the update KB3163018or 1607 AU . Download the archive with the folder jdk , unload VIDA Monitor, delete the folder jdk from C: \ VIDA , unpack downloaded to C: \ VIDA , then reboot the PC. Archive with the necessary, to solve this problem, you can download at the end of the post.
* If the Username field is NOT active– the tablet did not work, apply again (after unloading the VIDA Monitor ) carefully following all the conditions, then restart the PC. Another option is to unpack the contents of 2014A-BD.exe into C: \ VIDA by agreeing to the replacement. Start from the administrator C: \ VIDA \ patch \ filldb.cmd (previously unloading the VIDA Monitor ).

Method 2 (recommended)

– At the bottom of the post there is a link to the resource where you can download the ready version with the adaptation to the extreme update of Windows 10 and the ability to use two languages ​​- Russian and English. Contains an easy way to install with cmd files (nothing needs to be entered manually). Everything necessary for installation and normal operation on Windows 10 is already in the image.
Correction of the “cross” in the field “Communication tool”
If after starting, in the field “Communication tool” – a cross , you must run the reg.file from \ Install \ Utilson the image / disk with VIDA EnableIEHostingx86.reg or EnableIEHostingx64.reg (for x64 OS).
Done.
IE must be closed! Archive with the necessary files, to solve this problem, you can download at the end of the post.
Connecting and installing DiCE
If you plan to use Volvo VIDA DiCE:
– Connect the device to the OBD connector of the car (or supply it with power 5-12 V / 1-2 A suitable BP, dais does not get power via USB!).
– Connect it to the USB connector of the PC.
– Wait for the device to be installed in Windows.
– Start VIDA, make sure that DiCE is installed in the “Communication tool” field.
Done.
If you want to use DiCE on bluetooth (first necessarily connect via USB!), Run (corresponding to the bit depth of the OS) reg.file and search / add devices WT to the OS. The manual with the necessary reg.file for connection on bluetooth and driver for using DiCE without VIDA can be downloaded at the end of the post.
To check the device, use the regular DiCE Diagnostic utility in – Start – All applications – DiCE .
Installing EWD schemas in VIDA
To scheme EWD were available from VIDA , you must copy the contents of a folder Rus from the disc (image) in the EWD:
\ VIDA \ the jboss \ the standalone \ deployments \ VidaEar.ear \ VidaWeb.war \ wiring_diagrams \ Rus
When a disc / image EWD no folder Rus – copy the contents from, for example, US_Eng , in diagrams and in “English” everything is clear Copy it to the Rus folder , if VIDA is in Russian (if there is no such folder, create it). After restarting VIDA Monitor.
Done.
Are in the Information – Troubleshooting – Wiring diagrams .
– At the bottom of the post there is a link to the resource where you can download EWD .
volvo-vida-dice-win10-13
EWD 2014D
Access to VIDA over the network
For VIDA to be available over the network, you need to stop VIDA Monitor, change the line in the file:
VIDA \ jboss \ standalone \ configuration \ standalone.xml
<interface name = “public”>
inet-address value = “$ {jboss.bind.address : 127.0.0.1} “ />
</ interface>

to:
<interface name =” public “>
any-ipv4-address />
</ interface>

Then run VIDA Monitor (or restart the PC). On another PC, you need to install the accompanying software – IsoView and the DiCE driver (if needed there). From this PC (in the local network, VPN, etc.) in IE, enter the address of the PC with VIDA – * IP of the computer * / Vida (for example 192.168.1.25/Vida) or create a shortcut with the object “C:computer * / Vida.
Done.
How to delete car profiles that have already been read / entered
Run the file:
\ VIDA \ db \ dbutils \ clearDatabase.bat
Done.
All profiles are deleted! Separately, there is no way to delete. After, it is necessary to apply the tablet again .
volvo-vida-dice-win10-14
VIDA 2014D on Windows 10
volvo-vida-dice-win10-15
VIDA 2014D on Windows 8.1


Ways to solve problems with installation and startup on Windows 8.1 / 10 are taken HERE

2017/11/29

How to Install Volvo VIDA 2014D on Win 10 Light version for IT-PRO's

Installing Volvo VIDA 2014D on Windows 10 Guide Light version. FOR IT-PRO's ONLY!

Non IT-PRO's follow this post instead for a more detailed guide:
http://vidadice.blogspot.com/2017/11/install-volvo-vida-dice-2014d-on-windows-10.html

WHAT IS THIS?
For those of you that do not need in depth instructions but already know what simple things like run this and that as administrator, cmd commands, edit registry entries without fear etc... It gives the same results as the original guide but not nearly as specific instructions.
************************************************** **************************************************

REVISION HISTORY:
Rev 2. 2016-08-20
Rev 1. 2016-08-14
- First draft.
************************************************** **************************************************
REQUIREMENTS:
- Microsoft Windows 10 Pro x64
- Volvo VIDA 2014D
- VIDA Patch
2014A.exe 137 KB (140 785 bytes)
CRC32: E5F6F31C
MD5: 4E8084C08BDC59CB7D4DA16E708CDD8B
SHA-1: 4A1A38ECBF4608F7E36FDB38867F3A03D96D1B4C
************************************************** **************************************************
GUIDE:
If you have a clean install of Windows x64 and have not previously installed any version of VIDA or SQL (failed or not): this guide might be for you.
On a system where VIDA has previously failed to install or a previous version of VIDA has been installed and then uninstalled, the cleaning part is the MOST IMPORTANT part, you will find that pre-install guide here: https://vidadice.blogspot.com/ (use search button)


A. Download "Microsoft SQL Server 2008 R2 SP1 - Express Edition" x64 English version "ENU\SQLEXPR_x64_ENU.exe" (117.5 MB) and save it to C:\VIDAInstall\SQL2008R2SP1\ here:
http://www.microsoft.com/en-us/downl....aspx?id=26729

B. Download "Microsoft SQL Server 2008 R2 Service Pack 3" x64 English version "ENU\SQLServer2008R2SP3-KB2979597-x64-ENU.exe" (358.4 MB) and save it to C:\VIDAInstall\SQL2008R2SP3\ here:
http://www.microsoft.com/en-us/downl....aspx?id=44271 

C. Install Microsoft SQL Server 2008 R2 SP1 - Express Edition:
- In an Administrator Command Prompt run this:
Code:
"C:\VIDAInstall\SQL2008R2SP1\SQLEXPR_x64_ENU.exe" /ACTION=Install /IACCEPTSQLSERVERLICENSETERMS /ROLE=AllFeatures_WithDefaults /INSTANCENAME=VIDA /SAPWD=GunnarS3g3 /SECURITYMODE=SQL /SQLSVCACCOUNT="NT AUTHORITY\SYSTEM" /BROWSERSVCSTARTUPTYPE=Automatic /TCPENABLED=1 /HIDECONSOLE /ENU /QS
D. Install VIDA in Windows 7 compatibility mode: \Install\DVD\Vida_dvdheader\Main\setup.exe
- Select VIDA All-in-one and then the language(s) to install.
- Leave the default Destination.
- Let the installation download and install .NET Framework 3.5 if asked.
- Leave the default selection Internet as is, click Save and then Close, Close.
- When Setup asks for a reboot, select No.

E. Download and update Java:
- Uninstall all Java versions.
- End tasks VidaMonitor.exe, java.exe and javaw.exe if started, with Windows Task Manager.
- Delete jdk dir in C:\VIDA\.
- Download and install Java SE Development Kit 7u80 (x64) "jdk-7u80-windows-x64.exe" (140.09 MB) here:
http://www.oracle.com/technetwork/ja...k-7u80-oth-JPR
- Copy dir jdk1.7.0_80 from C:\Program Files\Java\ to C:\VIDA\.
- Rename dir jdk1.7.0_80 in C:\VIDA\ to jdk.
- Uninstall both the Development Kit and Java (no longer needed).

F. Install the patch:
- End task VidaMonitor.exe if started, with Windows Task Manager.
- Unpack the compressed files directly to C: with Z-zip or the like, overwrite all files when asked.
- Locate filldb.cmd in the C:\VIDA\patch dir and run it as administrator.
- Optional: Also run the patch as it is intended from the beginning: Run "2014A.exe" as Administrator and leave the default Destination folder as is (c:\) and select Install. Ignore the taskkill error.

G. Upgrade to Microsoft SQL Server 2008 R2 Service Pack 3
- In an Administrator Command Prompt run this:
Code:
"C:\VIDAInstall\SQL2008R2SP3\SQLServer2008R2SP3-KB2979597-x64-ENU.exe" /IACCEPTSQLSERVERLICENSETERMS /ALLINSTANCES /HIDECONSOLE /ENU /QS
H. Reboot.

I. Start Volvo VIDA All-In-One and allow Internet Explorer to Enable 'WebCGMHlprObj Class'.

How to install Volvo VIDA DICE 2014D on Windows 7 32-bit Step by Step

The latest version of Volvo VIDA 2014D software for DiCE Diagnostic System will 2014D. Software VIDA 2014D can be downloaded for free here:
http://pan.baidu.com/s/1kTo4bMf

Software Version: VIDA 2014D
Multi-Language:
Italian, English, French, Portuguese, Swedish, Japanese, Korean, Dutch, Russian, Turkish, Thai, Chinese Computer Requirement:
vida-2014d
Operating system: Win 7 Pro
Browser: IE9
CPU: 2.0 above
Memory: 4GB
C: // must have a space of 120 GB
Software must install on C: //
It must be in NTFS format
(Vida works with w7_64 and IE11!) You can also install all Windows updates 

BUT: DotNET 4.51 causes communication problems between 
VIDA and DICE Uninstall dotNET and everything works fine.

If you do not have Windows 7 32-bit O / S, you can download free here: http://www.obd2vip.com/html/win7-32bit-free-download-19514.html

How to install Volvo VIDA DICE 2014D on Win 7?
Key Steps:
Step 1: Install Wrar362
Step 2: Install IE9
Step 3: Install VIDA 2014D Configuration
Step 4: Install VIDA 2014 Patch
Step 5: Install Volvo Dice Driver
Step 6: Run VIDA Self Test & Diagnose Cars

Step 1: Install wrar362
Open Setup and install wrar362 Click "Select All" and "OK" Press "Done"
install-volvo-vida-on-win7-1


Step 2: Install IE9 browser
Install IE9 browser
Select "Ignore all programs" and press "Continue" Internet Explorer 9 is now installed, restart the computer
install-volvo-vida-on-win7-2


Step 3: Install Volvo VIDA 2014 configuration
Open VIDA 2014D CD or software folder
Open VIDA 2014-ABCD patch Copy 2014A.exe from desktop Open the "Install" folder Open the "DVD" folder Open "Vida_dvdheader" Open the "Main" folder Open and install "Setup" Select " VIDA All-in-one " Choose the language of the software Press" Next " Press" Next " Accept license agreement Install VIDA InstallShield Wizard Choose Vida Configurator Situation at" Internet ", press" Save " Close the contextual configuration result Close Vida Configurator
install-volvo-vida-on-win7-3
install-volvo-vida-on-win7-4
install-volvo-vida-on-win7-5
install-volvo-vida-on-win7-6
install-volvo-vida-on-win7-7
install-volvo-vida-on-win7-8
install-volvo-vida-on-win7-9
VIDA Setup Wizard is complete. Select "No, I will restart my computer later" and press "Finish" Step 2: Install VIDA 2014 Patch
install-volvo-vida-on-win7-10
Open 2014A.exe on the desktop
Click "Install" to install Volvo VIDA 2014A Patch Allow Windows Security Alert Restart the computer !!!
install-volvo-vida-on-win7-11

Step 5: Install Volvo DiCE Driver
Open "VIDA All-In-One" software on the desktop
Enter Username "1", click "Log in" Select "Vehicle Profile" tab Connect Vida interface dice with computer via USB port System will automatically install the driver DiCE-206751 @ 000000000000 device driver successfully installed
install-volvo-vida-on-win7-12


Step 6: Run VIDA Self Test & Diagnose Cars
Select the "dice 206751" communication tool
Check "DICE CONFIGURATION"
Select "COMMUNICATION test tool" Press "Run" to run the test Test results OK, close- Click "READ VEHICLE" in the tool VIDA communication detect vehicle information Manually enter transmission, direction, Corpulence etc. information "DIAGNOSIS" tab Select VIDA will check VIN and communicate with EMC
install-volvo-vida-on-win7-13
install-volvo-vida-on-win7-14
install-volvo-vida-on-win7-15
install-volvo-vida-on-win7-16
Start diagnosing your vehicles, clear fault code etc.
install-volvo-vida-on-win7-17