2020/05/15

Volvo PTT 2.7.98 Free Download and Activation

Latest version Volvo Premium Tech Tool V2.7.98 has been tested and verified working. Follow guides below to download and activate Volvo PTT 2.7.98 software.


Software Version
PTT 2.7.98 Full Development with Newest APCI+ 2020.05 Database
v2-7-98-volvo-ptt-download
Compatible hardware: Nexiq USB Link, xtruck, DPA4+, DPA5,Vocom, 88890020, Noregon  for diagnostics of Volvo trucks, Volvo buses, Volvo Construction, Volvo Penta, Mack Trucks, Renault Trucks, UD Trucks.
Supports Volvo trucks till year 2020.
Support version 3 and 4


Free Download Volvo PTT 2.7.98
this link for VM_ware 15.1(inc kg)

Link for PTT
(password: mhh_ptt)

How to activate this Volvo PTT 2.7.98?
Press start button on windows go to search on the right tabel ,type cmd,
Run as admin,type cd \TechToolLicenseEditor and press enter,
Type run press enter and wait to open activator,here press erase full database choice type of activate between normal and dev after press create database with new key and finally press patch log in.
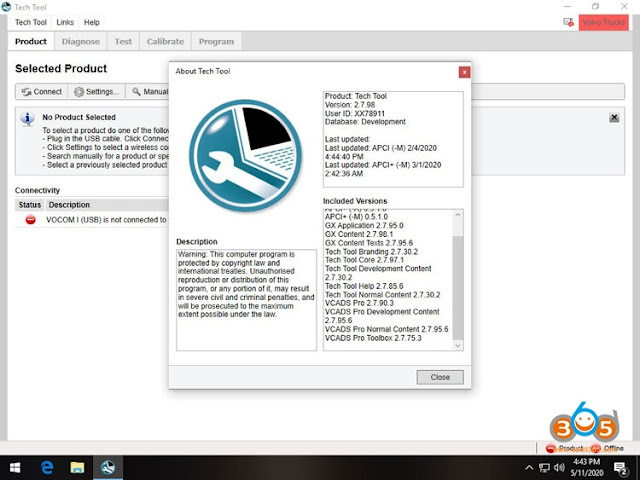
use known xx78911 for log in in program.
if need ISS you will find kg in folder downloads.

Credit to userfane from mhhauto.

and this is the 100% tested and safe version PTT 2.7.98.
Online installation directly via volvo server (need Online account from Volvo) – support USA trucks as well.
Software includes dev2tool with standard database, visfeed and ptt.
Provide us order number to activate.


Volvo Tech Tool V2.7.98 software displays:

v2-7-98-volvo-ptt-software-1

v2-7-98-volvo-ptt-software-2

v2-7-98-volvo-ptt-software-3

v2-7-98-volvo-ptt-software-4

v2-7-98-volvo-ptt-software-5


2020/03/04

Free Download and Install Volvo Tech Tool PTT 1.12

Part of Volvo VOCOM clone comes with default free Premium Tool 1.12 software and optional higher V2.xx version. Here you can download PTT 1.12 software for free:

Free Download Volvo PTT 1.12
Software version: PTT 1.12
Operating system: Windows XP, Windows 7
Multi-language: Czech, Danish, Dutch, English, Spanish, French, Italian, Burmese, Romanian, Turkish, Russian, Finish, Swedish,Thai, Chinese, Korean, Japanese, Latvian, Lithuanian etc
volvo-ptt-1.12-software

How to Install and Activate Volvo Tech Tool 1.12?

Step 1: Install PTT setup
Open software CD
install-volvo-ptt-112-software-1
Install PTT 1.12 run the setup
install-volvo-ptt-112-software-2

Enter installation ID:123456
install-volvo-ptt-112-software-3

Install setup completed
Reboot PC

Step 2: Activate PTT
install-volvo-ptt-112-software-4
install-volvo-ptt-112-software-5
Open VTT 1.12_KG folder and run Premium Tool keygen
install-volvo-ptt-112-software-6
Test connection
Delete previous records
install-volvo-ptt-112-software-7

Press Activate
Write down the login ID: M311331
Open Tech Tool software on desktop
install-volvo-ptt-112-software-8

PTT require to enter User ID (login ID): m311331 (don’t need password), Press OK to continue
install-volvo-ptt-112-software-9

Check Volvo PTT 1.12 version software features
install-volvo-ptt-112-software-10

Go to Menu->Settings
install-volvo-ptt-112-software-11

Select language you desired

Step 3: Offline Update
Stop networkupdateagent service and program
install-volvo-ptt-112-software-12
install-volvo-ptt-112-software-13
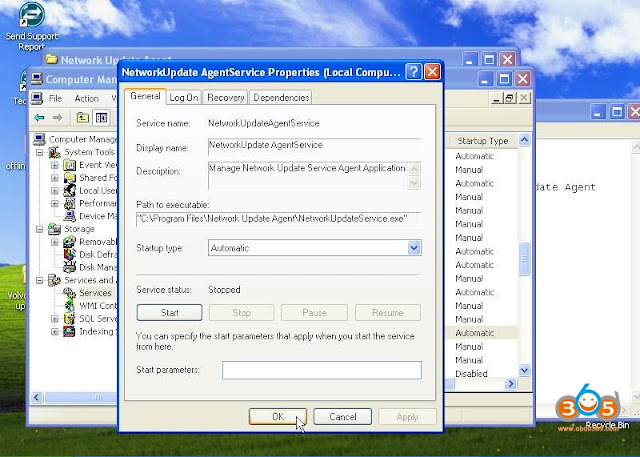
Go to Computer Management-> Services and Applications->Service->disable networkupdateagent service and program
install-volvo-ptt-112-software-14
In Win7 system, must end the networkupdateagent in Task Manager
install-volvo-ptt-112-software-15

install-volvo-ptt-112-software-16

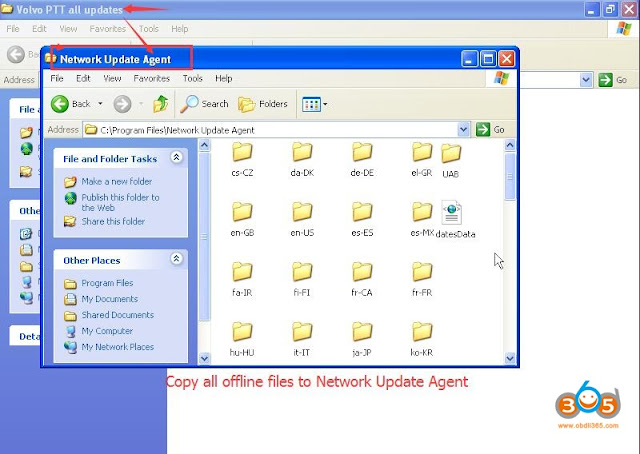
copy all offline files to C:/Program Files/Network Update Agent
install-volvo-ptt-112-software-17

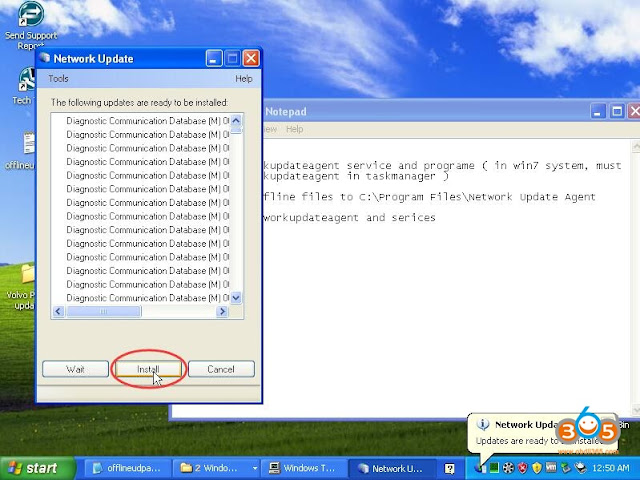
Run the networkupdateagent and services
install-volvo-ptt-112-software-18
Wait for 1-2 hours until the offline network update completed.
Done.


Read also:

2019/12/05

Volvo Tech Tool PTT 2.7.85 Released Notes

Link to Volvo Tech Tool 2.7.85 software:
volvo PTT 2.7.85
Updated on 11/2019


Laptop Requirements:
Computer/Processor Intel® Core i5 or​ i7 / i9
Memory (RAM) 4 GB, more memory improves performance
Hard disk Type SSD (Solid State Drive) with 80 GB free space

OS Requirements:
Windows 7 8, 8.1, 10 Professional or Enterprise 32 bit x86​ or 64 bit x64
Install and activation Volvo Tech Tool (PTT) 2.7.85 only by TeamViewer

Region: All regions
Download size: 14 GB

Product: Tech Tool
Version: 2.7.85
User ID: XX27850
Database: Development
Last updated: APCI (-M) 05/11/2019 3:44:17 PM
Last updated: APCI+ (-M) 13/10/2019 8:34:17 AM
APCI (-A)
APCI (-M) 000.009.001.0
APCI+ (-A) 0.5.1.0
APCI+ (-M) 0.5.1.0
GX Application 2.7.80.3
GX Content 2.7.80.1
GX Content Texts 2.7.85.0
Tech Tool Branding 2.7.30.2
Tech Tool Core Expected version: 2.7.85.0
Tech Tool Development Content 2.7.30.2
Tech Tool Help 2.7.0.12
Tech Tool Normal Content 2.7.30.2
VCADS Pro 2.7.85.0
VCADS Pro Development Content 2.7.85.0
VCADS Pro Normal Content 2.7.85.0
VCADS Pro Toolbox 2.7.75.3


Compatible hardware:


Description:
Tech Tool is a tool that supports the repair and diagnostic process and was developed in order to make work in the workshops easier and more efficient.

Tech Tool is an application for diagnostics with the possibility to use plug-ins to cover the whole repair process. With Tech Tool you can diagnose, test, calibrate and program a product. A product could be a vehicle, engine or machine.

The set of plug-ins, user authorizations, and available languages is adjustable to provide every user with what they need.


Volvo Tech Tool 2.7.85 released notes:
volvo PTT 2.7.85 release notes
New features:
With this release of tech tool, a new fault tracing strategy is introduced. the new strategy will gradually replace the old one over the upcoming releases. see the tech tool release news for more information.

General information:
This tech tool update contains maintenance issue corrections.

Operation news:
Operation 6476-07-03-01 “active steering calibration” and fault tracking added for volvo dynamic steering system. only applicable to north america.

Diagnostic updates:
Fault tracing information has been updated to be compliant with new hardware and software required to meet emission regulations.
Applicable to models FH and FM. Only applicable to China
Improved fault tracing information for SCR system, Euro 6. NOt applicable to north america.

2019/11/05

Volvo DiCE VIDA 2015A vs. VXDIAG VCX NANO Volvo 2014D

Look here: the two popular Volvo diagnostic and programming tools: Dice/VIDA cheap china clone and Allscanner VXDIAG VCX NANO for Volvo

Now, we’re gonna to talk which is better

Volvo diagnostic toolDiCE/VIDAVXDIAG VCX NANO Volvo
Image 
volvo-dice
 
vxdiag-nano-2014d
Price$135.00$59.99
Original/cloneChina cloneOriginal
Allscanner made
Latest softwareVIDA 2015AVIDA 2014D
Operating systemWindows 7 32 bit: tested!
Windows XP: need luck
Windows 8: need luck
Windows 10: need luck
MacOS: need luck

Windows 7 32 bit: tested!
Windows XP: need luck
Windows 8: need luck
Windows 10: need luck
MacOS: need luck
LanguageItalian/ English/ French/ Portuguese/ Swedish/ Japanese/ Korean/ Dutch/ Russian/ Turkish/ Thai/ Traditional Chinese/ Simplified ChineseItalian/ English/ French/ Portuguese/ Swedish/ Japanese/ Korean/ Dutch/ Russian/ Turkish/ Thai/ Traditional Chinese/ Simplified Chinese
Vehicle coverage1999-2017
(only some 2017 models covered, but most 2015 cars covered)
1999-2014
Obd2 diagnosisYesYes
ProgrammingYesYes

Conclusion:
Dice VIDA 2015A covers more Volvo cars and it works perfectly for most cars, even some new cars made in the year 2019. but there are different Dice china clone, pls confirm that the one you have is a decent one like http://www.obdii365.com/wholesale/vida-dice-2015a-diagnostic-tool-for-volvo.html (the best-quality clone)
Vxdiag VCX Nano Volvo uses its own firmware and runs quicker. But it can works with 2014D only!


Reference:
Volvo VIDA 2015A download:

Volvo VIDA windows 7 install: (100% success)

Volvo VIDA 2015A installation requirement:

Volvo VIDA log in:

Volvo VIDA how to program a module:

Volvo VIDA – What’s fun:

Volvo VIDA how to update:

Volvo VIDA how to crack:
A couple of weeks ago the car suffered a spurious DIM fault which left me with a SRS alarm standing. Unsure of what faults may be laying in wait and in order to clear the SRS alarm, I ordered a VIDA/DICE unit from EBAY.
I know that VIDA/DICE is a big issue on the forum and has been covered many times, but I wanted to put down my experience while it is still fresh in my mind, and that it may help any out there who are struggling or are wondering whether to get a unit or not.
Once I got the VIDA/DICE unit I set about looking at the numerous posts that had been put on various forums, and I realised immediately that this was not going to be as easy as most software / hardware you buy off the shelves. However. my first challenge was to find a laptop with Win 7 professional on it. Luckily my son had a large desktop / laptop with it on and he let me do a fresh install and update. I then followed a YOUTUBE video for installation. (No instructions came with the device at all).
Following along, I got VIDA 2014D installed OK. I then rushed out to my car to try it out. When I plugged the DICE into the computer it searched for the drivers and eventually recognized the device. I then started VIDA, but it would not see the DICE unit. Just a box with a Red X in it.
OK so back to the forums to see what people did about that. I must have tried innumerable combinations of things and I was about to give up. As a last ditch effort I dug out an old Toshiba Laptop I had. This only had Vista Home Premium on it, but it was a 250GB drive, 4GB of RAM and an Intel Core DUO processor (P8600) which was way below the spec of my sons laptop, but adequate for VIDA. I searched on the WEB for the cheapest WIN 7 professional license I could buy and got one from Software GEEKS for £19.
I loaded the 32 BIT version as this is all the laptop could cope with. Followed some of the tips I had picked up on the forums, and loaded VIDA back up again. I went out this morning in the pouring rain to try and connect it to the car – hey presto – it worked. I have checked and cleared down the faults, including the SRS alarm. I am a very happy man. So below is the setup I used which worked for me and I hope it helps someone else out there who has been struggling.
1. I purchased a VIDA / DICE unit with the latest 2014D software. The VIDA unit has multicoloured lights on it. I had read on the forums that there were some out there with only Blue Lights and seemed to give problems.
2. Use WIN 7 professional 32 Bit and let windows do a full update (takes ages). You will certainly need to ensure that service pack 1 is installed. When mine was loaded and updated, it only had Internet Explorer 8 on it. I had to download and install IE9. VIDA 2014D would not load with only IE8 in place.
3. Download the latest version of JAVA
4. At this point I created a restore point in windows, so I could revert to this point should I have problems installing VIDA.
5. I then turned off User Account Control (UAC) and disabled the Windows Firewall.
6. Check that the only version of .net that you have is .NET 3.5. I had read that if you are on version 4 VIDA doesn’t like it. (You can check the version in the registry editor in Windows)
7. I then loaded VIDA following this Youtube video https://youtu.be/b5XMXqsSlHw
  1. Once VIDA was proven to work, I then took the laptop out to the car and connected the DICE unit to the OBD2 socket and plugged it into the laptop. Windows searched for the drivers and installed them. When I opened VIDA up, I needed to enter all the car details in the Vehicle Profile section. This time the page also showed my DICE unit in the DICE configuration Box. With the vehicle details entered, the Diagnostics TAB activated and as long as the Ignition is in the II position, it will read all the onboard computers.
    Why didn’t this work for me the first time I tried it? I think it might be that VIDA / DICE didn’t like the 64Bit version of Win7 Pro, although others may have got it working on that platform. I also think I got in a mess with the .net 3.5 vs the .net 4.5.
    My thanks to all those on various Forums who have posted up their solutions. Most are for earlier versions of VIDA, and I didn’t see many for the 2014D version that I bought.
    It has been a long week messing around with this, but I am currently walking on air.
    One final tip – while messing around with VIDA on the car the ignition is on. I would put the battery charger on while in this state as the battery soon runs down. I’m currently waiting for it to charge up so I can start the car!!!
    Volvo VIDA 2015A where to:


2019/10/09

How to solve Volvo DiCE VIDA Communication Error?

Steps to test DiCE communication with VIDA:
  1. Connect the DiCE unit by USB cable to your computer.
  2. Start VIDA.
  3. Open the Connected Vehicles tab.
  4. Select the DiCE to be tested in the drop-down menu.
ðThe DiCE Configuration button appears.
volvo-vida-2014d-connection-1
5. Click DiCE Configuration.
ðThe DiCE Configuration pop-up opens.
6. Click Test Communication Tool to start the test of the USB connection.
ðThe Test Communication Tool window is opened.
7. Select the communications to be tested by ticking the check boxes. By default, if no check boxes are ticked, the first eight elements are tested.
8. Click Run to start the test.
 OK should be displayed to the right for every row.
9. Click Close in the Test communication tool window.
Do not close the Test/Remove DiCE window.
10.  Remove the USB cable from the DiCE unit.
volvo-vida-2014d-connection-2

The DiCE will now communicate via Bluetooth.
11. If you are using a computer with a built-in Bluetooth receiver, this receiver has to be disabled in order for the Bluetooth adapter to connect properly to your computer.
12. Press [WIN] + [R] on your keyboard.
The Run window opens.
13. Type devmgmt.msc and press [ENTER] .
At this point, a User Account Control pop-up window might open. In that case, click Yes.
The Device Manager opens.
14. Double click Bluetooth Radios.
15. Right click all devices listed under Bluetooth Radios and select Disable.
The built-in Bluetooth receiver(s) are disabled.
16. Connect the Bluetooth adapter to a free USB port on the computer.
17. In VIDA, click Test Communication Tool to start testing the Bluetooth connection.
18. Select which the communications to be tested by ticking the check boxes. By default, if no check boxes are ticked, the first eight elements are tested.
19. Click Run to start the test.
 OK should be displayed to the right of every row.
20. Click Close in the Test communication tool window.
21. Click Close in the DiCE Configuration window.
Close the DiCE Configuration window by clicking Close.
The DiCE unit is now configured for both USB and Bluetooth connection at the VIDA client.
If DiCE is connected with a USB cable, the communication will always go through the cable.

DiCE/VIDA questions and answers:

Q: When I plug Dice into the laptop after loading it, I can read the car and pick up the VIN and other info. I also pass the Dice diagnostic test in Vida. Car is plugged into a charger to keep the volts up.
However, when I finally try the Diagnostic Tab to read my ECU and other Volvo computer codes it always stalls and gives me an error once it gets to ‘’identifying AUU’’. It tells me I have a communication error… always, tried it in admin, 1, car running, car in position 2…. running out of options.
A: Solved!
So it was some sort of compatibility issue between my version of Vida and Dice…
Uninstalled everything, brought .NET to version 3.5. Installed Vida 2014D and we are up and running.

Q: The communication tool is completely blank with a red X. I have rolled back to framework 4.0 with no luck. If you find anything let us know.
A: Just wanted to update you that I have fixed my issue. And for anyone else with this issue here you go for windows 7 64.
Hold windows key + R. Type regedit. Go to Computer\HKEY_LOCAL_MACHINE\SOFTWARE\Wow6432Node\Microsoft\.NETFramework
Once there click on the .NETFramework file and you will see 2 values (Default) and InstallRoot. There should be a 3rd value.
Right click .NetFramework than go to new and down to DWord (32bit) and click it. Name the new one “EnableIEHosting” without the quotations. Than right click the item you just renamed and click modify. In the value type “00000001” without quotations. Should be seven 0s and a 1. Click ok.
Congrats. Relaunch the webpage login and you should be able to pick your tool.

Q: Win 7 Pro, 64bit. running IE8
DiCE is working fine in its test tool, VIDA is work fine on its own, but I can’t choose a communication tool…
A: SOLVED the problem (DICE not recognized). I found out since I have 2 separate laptops:
  1. Dell 2120 Windows 7 Ultimate 64-bit IE 9 was a no go: DICE not recognized.
The .Net Framework file could not be found (this is the culprit) so I could not uninstall it.
  1. Dell D630 Windows 7 Pro 32-bit IE 9:
Once I uninstall .Net Framework 4.6.1., DICE is recognized.
This may be why they say turn off Windows Update during installation of VIDA to prevent .Net Framework installation.
I don;t know if this is true, but uninstalling .Net Framework 4.6.1. SOLVED the problem.

PS: Ironically, for Windows XP and earlier version (such as VIDA 2013A etc.), I needed to install .Net Framework, it is weird!

Q: Just got Vida/Dice and installed 2012a fine on my Win 7 Pro laptop. Everything looks good, except when I open the dice diagnostics tool included, it doesn’t see any unit connected. When I plug the unit into my car or laptop, the firmware status and vehicle interface status both light up solid. When I try to read info from the car or do the dice test in vida, it fails saying it could not connect. Device manager says the unit is working correctly and the drivers all installed fine.
I looked through the log and all I could find was this, where it repeatedly mentions “Invalid Device ID.
VIDA release: VIDA2012A
A: Solved this finally, after about 10-15 hours of frustration. Turns out the DICE unit I purchased is a cheaper version that uses some non-standard driver (CP2102 USB to UART Bridge Controller available here: http://www.silabs.com/products/mcu/P…CPDrivers.aspx) that I had to find and install myself. It also would not work on Windows 7 Pro, I had to install to XP mode which was an ever bigger pain due to incredible instability. I think the fact that I have an AMD processor and needed a hotfix to even get XP mode to work contributed to it, but if I changed the RAM for XP mode to anything other than 512MB, the virtual PC would reboot constantly. So I had to copy the entire VIDA 2012A DVD to my desktop (about 2 hours) and then modify the installation file to eliminate the 2GB RAM requirement check, and then install VIDA (about 3 hours). VIDA 2012A runs fine with only 512MB RAM, just a lot slower.
If your DICE unit is cheap and has only blue LEDs and when plugged in the Firmware Status LED is solid, you probably are going to need to download that driver to get it to work.
Hope this helps someone in the future.